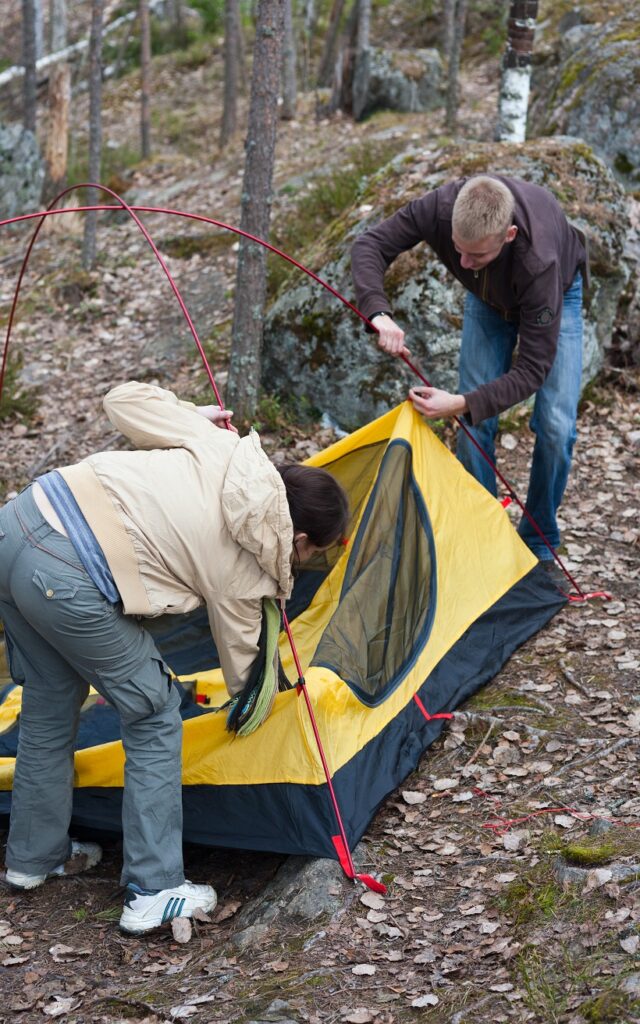
Setting up a tent in nature feels a little different than doing it in your backyard or a crowded campground. There’s no perfectly flat grass, no picnic table to organize your gear, and sometimes no one around to ask for help.
The first time I pitched a tent out in the wild, I realized quickly that where and how you set up matters just as much as the tent itself. This guide is for anyone who wants camping to feel calm instead of chaotic.
Whether you’re brand new, camping solo, or bringing your family along, I’ll walk you through the process the same way I learned it — step by step, without rushing, and without overcomplicating things.
You don’t need to be an expert. You just need a little know-how before you start.
Choose the Right Spot Before You Touch the Tent
(Critical for safety + comfort)
Look for Flat, Slightly Elevated Ground
I always start by walking around for a minute instead of dropping my pack right away. Flat ground matters more than you think, especially for sleeping. Even a small slope can leave you sliding all night.
Slightly elevated spots are best because they help water drain away if it rains. If I’m unsure, I’ll actually lie down for a second to see how it feels — it’s a quick test hacks that saves a lot of discomfort later.
Avoid Low Spots, Dry Riverbeds, and Animal Paths
Low areas might seem sheltered, but they’re where water naturally collects. Dry riverbeds are especially risky because they can flood fast, even if there’s no rain where you are.
I also watch for signs of animal paths, like flattened grass or narrow trails. Animals move through these areas regularly, and it’s not where you want to set up your sleeping space.
Check Wind Direction, Sun Exposure, and Natural Shade
Before pitching the tent, I take a moment to feel which way the wind is blowing. I try to face the tent door away from strong wind so it’s quieter and warmer inside.
Sun exposure matters too — morning sun helps dry condensation and makes waking up easier.
Shade is great in hot weather, but I always check above for dead branches before trusting a tree for cover.
SEE THIS: Camping Tent Buying Guide: How to Choose the Right Tent Without Overthinking It!
Know How Far to Camp From Water Sources
Camping near water sounds nice, but getting too close can cause problems. Bugs, damp ground, and sudden water movement are all more likely.
I stick to camping at least about 200 feet away from lakes, rivers, or streams. It protects the environment and keeps my campsite drier, quieter, and more comfortable. It’s one of the simplest Leave No Trace habits that makes a big difference.
SEE THIS: The Story Behind Pretty Place: Why This Scenic Hiking Trail Feels So Peaceful!
Clear and Prepare the Ground
Remove Rocks, Sticks, Pinecones, and Sharp Debris
Once I’ve picked my spot, I take a few minutes to clear the ground. This step is easy to rush, but I’ve learned it’s worth slowing down.
Small rocks, sticks, and pinecones don’t just make sleeping uncomfortable — they can damage your tent floor over time.
I gently move debris out of the way using my hands or a shoe, focusing only on the surface. I’m not trying to make it perfect, just safe and smooth enough to sleep on.
PS: This article talks how to make your tent feel more comfortable!
Why You Shouldn’t Dig Trenches or Disturb the Soil
It can be tempting to dig little trenches or scrape away dirt to “fix” the ground, but I never do this. Digging damages the natural environment and can actually make water flow toward your tent instead of away from it.
Modern tents are designed to handle rain without ground trenches. Leaving the soil as undisturbed as possible helps protect the area and keeps your campsite looking natural for the next person.
When to Rotate Your Tent for Slope Correction
If the ground isn’t completely flat, I don’t try to fight it — I work with it. Instead of digging or forcing a level spot, I rotate the tent so my head will be slightly uphill when I sleep.
This small adjustment makes a big difference in comfort and helps prevent that sliding-down feeling in the middle of the night. Sometimes a simple rotation solves the problem better than moving to a new spot.
SEE THIS: The Quiet Rituals Hikers Do While Watching the Sunset Over a Mountain Trail!
Do a Quick Test: Lie Down Before Pitching the Tent
Before I commit and start setting up poles, I do a quick test. I lie down right where the tent will go. It might feel silly, but it instantly tells me if the spot works.
I can feel bumps, slopes, or pressure points right away. If it feels uncomfortable now, it won’t magically feel better later — so I adjust while it’s still easy.
Lay Down a Ground Cloth or Footprint
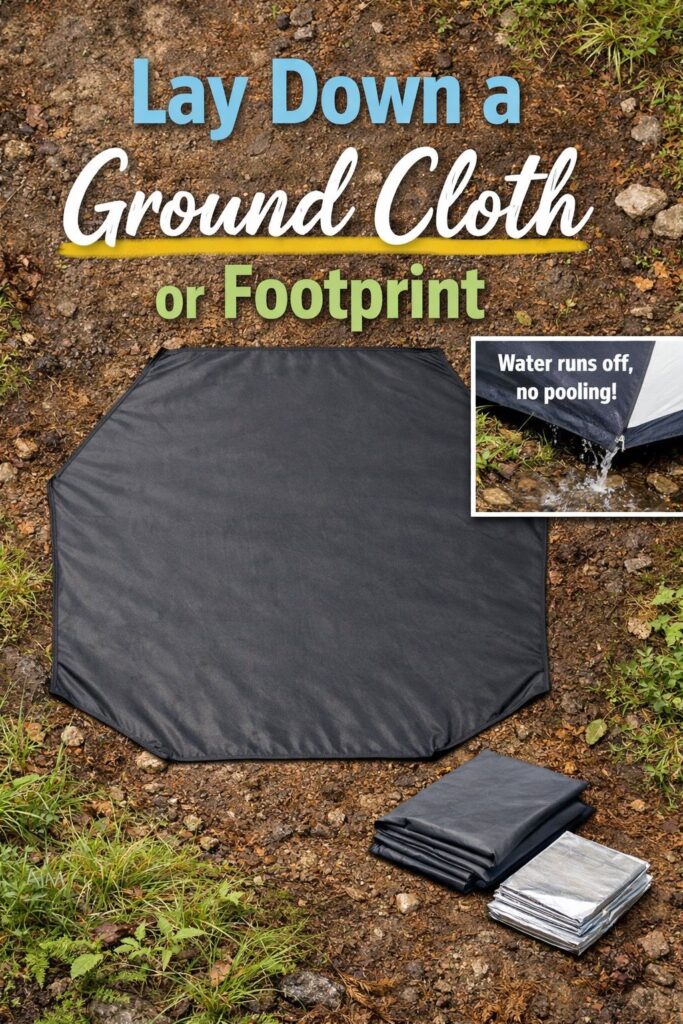
Why This Step Matters in Natural Terrain
In nature, the ground isn’t forgiving. Even when it looks smooth, moisture, grit, and tiny sharp bits can wear down your tent floor over time.
I think of a ground cloth or footprint as cheap insurance.
It adds a protective barrier between my tent and the earth, helps block moisture from seeping up, and makes cleanup easier when it’s time to pack up. This one step can seriously extend the life of your tent.
How to Size a Ground Cloth Correctly
This part is important — your ground cloth should never stick out past your tent. If it’s larger than the tent floor, rain can collect on it and funnel water right underneath you.
I always lay the cloth down first and make sure it matches the shape of my tent as closely as possible. If it’s a little big, that’s fine — I just adjust it before the tent goes on top.
Fold the Edges Under to Prevent Water Pooling
Once the ground cloth is in place, I fold any extra edges neatly underneath so nothing is exposed. This keeps rain from pooling and helps water run away from the tent instead of toward it. It’s a small detail, but it makes a huge difference during wet weather. I do this even when rain isn’t in the forecast — just in case.
SEE THIS: Forest Hiking Trail Inspiration: The Best Trails to Explore for Scenic Walks!
What to Do If You Don’t Have a Footprint
If I don’t have a footprint, I don’t panic. A simple tarp, emergency blanket, or even a thick piece of plastic works in a pinch. The key is trimming or folding it so it stays fully under the tent. As long as nothing sticks out, you’ll still get the protection you need without harming the ground or your gear.
Unpack and Organize Tent Components
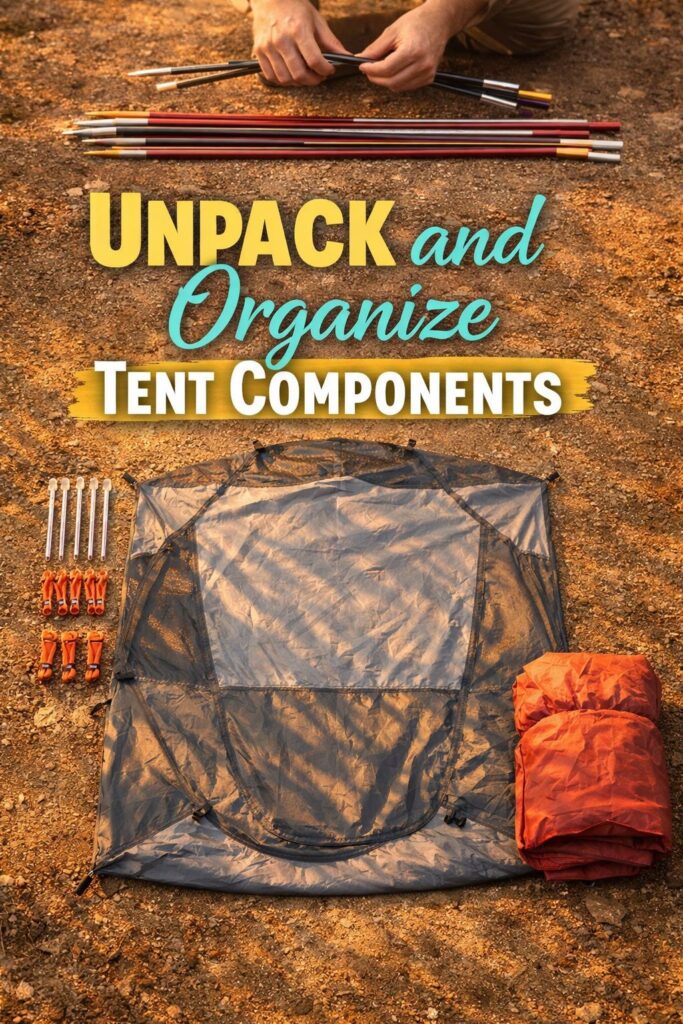
Start With the Tent Body
The first thing I pull out is the tent body itself. I spread it out flat so I can see the floor, doors, and attachment points.
Most modern tents from brands like REI, Coleman, and MSR have clearly marked doors and corners, which helps me orient everything correctly from the start. Laying the tent body out first also makes it easier to spot where poles and clips will go later. Click here to view some of the camping tent brands!
Identify the Poles (Especially Color-Coded Systems)
Next, I grab the poles and let the shock cords snap them together naturally — never forcing them. Many tents use color-coded systems now, which makes this step much easier.
Brands like Big Agnes and Kelty often match pole colors to clips or grommets on the tent body. If I see matching colors, I know exactly where each pole belongs, which saves time and prevents mistakes. Click to view and order solid tent poles here.
Lay Out Stakes and Guylines
After the poles, I set out the stakes and guylines. Even if I don’t plan to use every guyline, I like having them visible so I don’t forget them.
Stakes vary a lot depending on the tent — lightweight backpacking tents like those from NEMO Equipment usually come with thinner stakes, while family tents often include heavier ones.
I keep guylines untangled now so I’m not dealing with knots later, especially if the wind picks up. Click to view and order some backpacking tents here.
Keep the Rainfly Handy
I always pull the rainfly out early and set it aside within reach. Even if the weather looks perfect, I don’t want to dig through a stuff sack later if clouds roll in.
Most rainflies are designed to line up with doors and vents, and brands like The North Face make it pretty intuitive. Having it ready makes the final setup smoother and faster. Click to view and order some Rainfly for tents here.
Pro Tip: Use a Simple Layout Order That Prevents Mistakes
My go-to layout order is simple: tent body in the center, poles above it, stakes and guylines to one side, rainfly folded nearby.
This visual setup keeps me from skipping steps or attaching things out of order. When everything is laid out clearly, tent setup feels calm and intentional instead of rushed or frustrating.
Assemble the Tent Poles Correctly
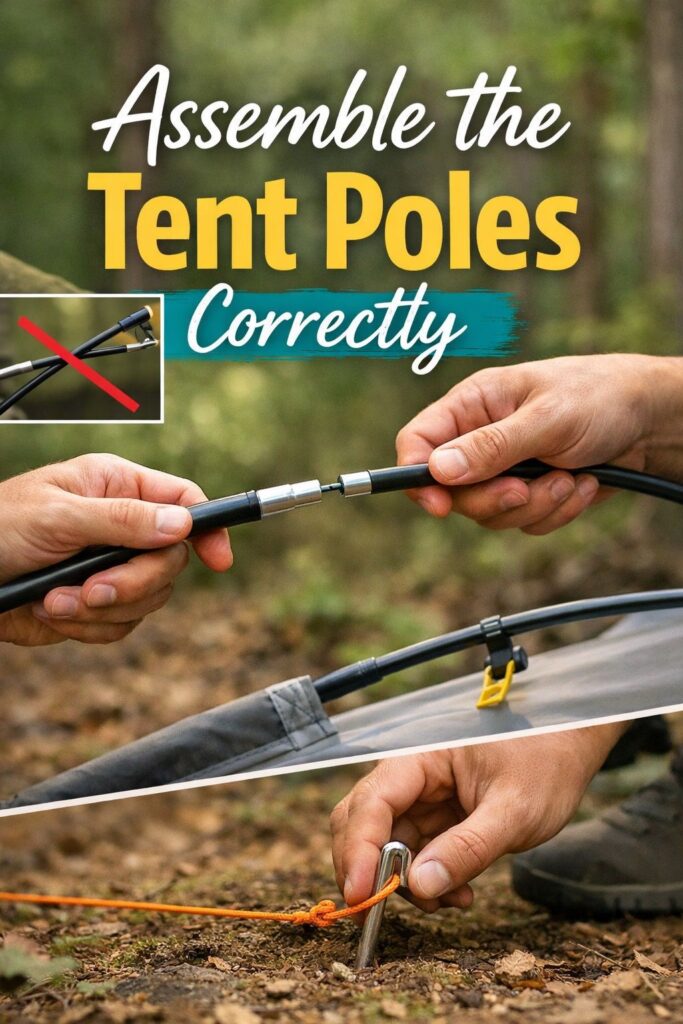
Handle Shock-Corded Poles Gently to Avoid Snapping
Most modern tents use shock-corded poles, and the biggest mistake I see (and used to make) is forcing them together. I let the sections snap into place on their own, guiding them gently instead of pulling from one end.
Brands like MSR and Big Agnes design poles to align naturally if you let the cord do the work. If a pole feels stubborn, I stop and reset — forcing it is how poles crack or splinter. Click to view and order some tent clips here.
Match Poles to Sleeves or Clips
Once the poles are assembled, I check how the tent body is designed to hold them. Some tents use fabric sleeves, while others rely on clips.
Sleeves take a bit more patience, but sliding the pole through slowly keeps fabric from snagging and makes the whole process smoother.
Solo vs Two-Person Assembly Tips
When I’m setting up solo, I start by anchoring one corner of the tent body with a stake so it doesn’t slide around while I work. That small step makes pole placement much easier.
With two people, it’s all about communication — one person feeds poles while the other clips or guides the structure into shape.
Either way, slow and steady wins. Rushing is how mistakes happen.
Attach the Tent Body
Clip vs Sleeve Tents: What to Expect
Once the poles are in place, I attach the tent body, and this part looks different depending on the tent design.
Clip-style tents are the most beginner-friendly.
Popular brands like REI, Kelty, and Big Agnes use clips that snap right onto the poles, which makes setup faster and improves airflow.
Sleeve tents, which are more common on older or budget models, take a little more patience. I feed the pole through slowly and evenly so the fabric doesn’t bunch or snag. Click to view to get some options here.
Keep the Tent From Shifting Mid-Setup
One thing I’ve learned the hard way is that an unstaked tent loves to move around while you’re working. If I’m setting up solo, I lightly stake down one or two corners before fully attaching the tent body.
This keeps everything aligned and stops the tent from twisting as I clip or sleeve the rest. Even a loose stake makes the whole process feel more controlled.
Make Sure the Doors Face the Right Direction
Before I finish clipping everything in, I double-check where the doors are facing. I like the main door facing away from strong wind and toward the most open part of the campsite.
If I’m camping with a view, I’ll aim the door that way too — it makes mornings feel better. This is also when I make sure I’ll be able to step out of the tent without tripping over gear, roots, or rocks.
Align Vents for Better Airflow
Good airflow keeps condensation from building up overnight, so I always check the vents before calling the tent “done.”
Many modern tents, including models from NEMO Equipment and MSR, have built-in vents designed to work with the rainfly later on. I make sure nothing is twisted or blocked so air can move freely once the tent is fully set up.
Stake the Tent Securely (Even in Tough Soil)
Use the Correct Stake Angle for Natural Ground
When I stake a tent, I don’t push the stakes straight down. I angle them slightly away from the tent, about 45 degrees, so they hold tension instead of popping out.
This matters even more in natural ground where soil isn’t perfectly compact. Most tents from brands like REI and Kelty are designed to work best when stakes are angled correctly — it keeps the tent stable without over-tightening the fabric. Click to view these Kelty tents here.
Adjust Your Staking Style for Sand, Forest Soil, or Rock
Different ground needs different approaches. In sandy soil, I push stakes in deeper and use a shallower angle, or I bury them horizontally if needed.
In forest soil, I watch for roots and adjust placement instead of forcing a stake straight down.
Rocky terrain is the trickiest — sometimes I shift the stake just a few inches until I find a spot that works.
Lightweight backpacking tents from Big Agnes or NEMO Equipment often include stakes designed to handle varied terrain, but flexibility is still key.
What to Do If Stakes Won’t Go In
If a stake won’t go in, I stop pushing. Forcing it can bend the stake or damage the guyline. Instead, I move it slightly, adjust the angle, or choose a new anchor point.
If the ground is too hard, I rely more on guylines tied to rocks or trees. This is common in backcountry spots and totally normal — you don’t need perfect soil to set up a solid tent.
Use Rocks the Right Way Without Damaging Your Tent
Rocks can be great anchors if you use them correctly. I place rocks on top of staked guylines or tie guylines around large, stable rocks. I never put rocks directly on the tent fabric — that’s how tears happen.
Brands like MSR even design tents with strong guy-out points meant for alternative anchoring. The goal is stability without stress on the tent body.
Add the Rainfly the Right Way
Why the Rainfly Matters Even in Clear Weather
I used to think the rainfly was only necessary if rain was in the forecast. I was wrong. Even on clear nights, the rainfly helps block wind, reduce condensation, and keep warmth inside the tent.
In nature, weather changes fast, and having the rainfly on gives me peace of mind. Most modern tents are designed to work as a system — tent body and rainfly together.
Line Up Doors and Vents Before Securing It
Before clipping or buckling the rainfly down, I take a second to line everything up. I make sure the rainfly doors match the tent doors and that vents are positioned where they’re supposed to be.
This step prevents frustration later when I’m trying to unzip something that doesn’t line up. Many rainflies have color-coded corners or small tags to guide placement, which makes this easier if you slow down and look.
Tighten Straps Evenly for Proper Runoff
Once the rainfly is in place, I tighten the straps evenly at each corner. I don’t crank them down all at once — I move around the tent, adjusting little by little.
This creates space between the rainfly and the tent body, which is what allows water to run off instead of soaking through. A well-fitted rainfly should feel snug, not stretched tight.
Use Guylines for Wind and Storm Protection (Don’t Skip This)
When Guylines Are Essential
If there’s any chance of wind, I use guylines — no exceptions. They’re not just for storms; they add structure and stability to the tent.
Even lightweight tents from Big Agnes and Kelty rely on guylines to perform their best in changing conditions. Skipping them is one of the most common reasons tents flap, sag, or collapse overnight.
How to Anchor Guylines Properly
I extend guylines at a wide angle away from the tent and anchor them firmly. The wider the angle, the better the support. I adjust tension so the fabric is taut but not strained. Over-tightening can stress seams, while loose guylines don’t do much at all. If the wind shifts later, I can always make small adjustments.
Use Trees and Rocks When Stakes Aren’t Enough
In tougher terrain, I often anchor guylines to trees or large rocks instead of stakes. I make sure whatever I’m tying to is stable and won’t move in wind. I never tie guylines directly to fragile branches or sharp edges.
Many tents from MSR are built with reinforced guy-out points specifically for these situations, which makes a big difference when conditions get rough.
Do a Final Tension Check Before Nightfall
Before I call the setup done, I walk around the tent and do one last tension check. Fabric relaxes as temperatures change, so a quick adjustment before dark helps prevent flapping and noise later. This small habit has saved me from many restless nights.
Do Final Setup Checks Before Moving In
Give the Tent a Gentle Shake Test
Before I bring my gear inside, I give the tent a light shake. Not aggressive — just enough to see if anything shifts. If the tent moves more than it should, I check the stakes, guylines, and rainfly tension. This quick test tells me right away if something needs adjusting before the wind picks up or night falls.
Check for Proper Water Runoff
I take a slow walk around the tent and look at how the ground slopes. I want water to flow away from the tent, not toward it. I also make sure the rainfly is sitting evenly and not touching the tent body anywhere it shouldn’t. Even small contact points can cause moisture to seep in overnight.
Test Zippers, Doors, and Vents
Before settling in, I open and close every zipper once. It’s a simple step, but it helps catch twisted fabric or tension issues early. I also make sure vents are open and aligned properly so air can move through the tent during the night. Good airflow makes a big difference in comfort.
Set Up the Inside for Comfort
Place Sleeping Gear First
The first thing I set up inside is my sleeping pad and sleeping bag. This helps me see how much usable space I really have and prevents me from piling gear where I’ll need to sleep later. I keep my head slightly uphill if the ground isn’t perfectly flat.
Keep Gear Off the Floor When Possible
I try not to let everything end up on the tent floor. I use side pockets, hang a headlamp from the ceiling loop, and keep shoes near the door.
This keeps the space feeling organized and makes nighttime exits easier. Even small tents feel better when the floor stays clear.
Balance Warmth and Airflow
Once everything is inside, I adjust vents and doors to balance warmth and airflow. If it’s cold, I close things down a bit more. If it’s humid, I leave vents open to reduce condensation. Every night is different, and I treat this step as something I can adjust as conditions change.
Common Tent Setup Mistakes in Nature
Setting Up Too Close to Water
Camping near water looks nice, but it often means bugs, damp ground, and surprise moisture. I always stick to a safe distance to keep my campsite dry and comfortable.
Ignoring Wind Direction
One of the easiest mistakes is not paying attention to the wind. Facing a tent door into strong wind can make the night noisy and uncomfortable. A quick adjustment early saves a lot of frustration later.
Skipping Guylines
Guylines might feel optional, but they’re not. Skipping them is one of the fastest ways to end up with a sagging or flapping tent in the middle of the night. I always use them, even when the weather seems calm.
Forgetting to Look Up
This one surprises people — I always check above my tent. Dead branches, loose limbs, or unstable trees can be a real hazard. A quick upward glance is an easy safety check that’s often overlooked.
Take Down and Pack the Tent Responsibly
Clean the Tent Before Packing It
Before I start pulling anything apart, I take a minute to clean the tent. I shake out dirt, leaves, and sand, and wipe away any moisture or mud. Even small debris left inside can cause wear over time. If the tent is wet, I let it air out as much as possible before packing — a few extra minutes now helps prevent mildew later.
Remove the Rainfly and Guylines First
I always start teardown by removing the rainfly and guylines. This reduces tension on the tent body and poles. I loosen guylines slowly instead of yanking them free, then coil them neatly so they don’t tangle in the stuff sack. If stakes are stuck, I wiggle them gently rather than pulling straight up and damaging the ground.
Disassemble Poles Carefully
When it’s time to break down the poles, I start from the middle sections and work outward. This keeps the shock cord evenly tensioned and prevents stretching.
I guide the sections apart instead of snapping them loose. Poles last much longer when they’re treated gently, especially after a long trip.
Fold or Roll the Tent Without Stressing the Fabric
I don’t worry about folding the tent perfectly. I loosely fold or roll it in a way that fits the stuff sack without forcing it.
Each time I pack, I slightly change the fold lines to avoid creating permanent creases. The goal isn’t perfection — it’s protecting the fabric and seams.
Restore the Campsite Before Leaving
Before I leave, I take one last look at the ground. I scatter any moved debris back into place, remove rocks used for anchoring, and make sure the site looks natural again. No trenches, no trash, no obvious signs I was there. Leaving a campsite the way I found it feels just as important as setting it up correctly.
Dry and Store the Tent Properly at Home
Once I’m home, I always unpack the tent again if it was even slightly damp. I hang it or spread it out to dry completely before storing it loosely in a breathable bag. This one habit has kept my tents in great shape for years and saves money in the long run.
Tent Setup in Nature Gets Easier Every Time
Setting up a tent in nature doesn’t have to feel overwhelming or stressful.
The truth is, once you slow down and follow a simple order — choosing the right spot, preparing the ground, securing your tent properly, and taking a few extra minutes to check your work — everything starts to feel easier.
Each step builds on the last, and confidence comes from knowing why you’re doing what you’re doing.
No two campsites are ever the same, and that’s part of the experience. Wind shifts, ground changes, weather surprises you — and you learn to adapt. The more you practice setting up your tent in real outdoor spaces, the more natural it feels. What once felt intimidating becomes routine.
If there’s one thing I’ve learned, it’s this: a calm, well-set-up tent changes the entire trip. You sleep better, feel safer, and actually enjoy being out there instead of worrying about what might go wrong.
Save this guide before your next trip so you can come back to it when you need a quick reminder. Future-you, standing in a quiet campsite with a tent bag at your feet, will be glad you did!