The first time I tried to build a backpacking tent, I thought I had everything under control. I’d watched a quick video, skimmed the instructions, and assumed it would be just like setting up a regular camping tent — only lighter.
I was wrong. Backpacking tents are simpler, yes, but they’re also less forgiving. Every pole connection, stake angle, and site choice actually matters.
When people say “build a backpacking tent,” they usually don’t mean constructing one from scratch. What they really mean is learning how to set it up correctly, efficiently, and confidently — especially when you’re tired, the light is fading, or the weather isn’t cooperating.
That’s what this guide is about. I’ll walk you through the process the same way I learned it: slowly, practically, and without assuming you already know anything.
By the end, you’ll know how to choose the right spot, assemble your tent without damaging it, and create a setup that actually feels secure and livable — not rushed or frustrating.
Choosing the Right Spot Before You Build
(This is where most tent failures start)
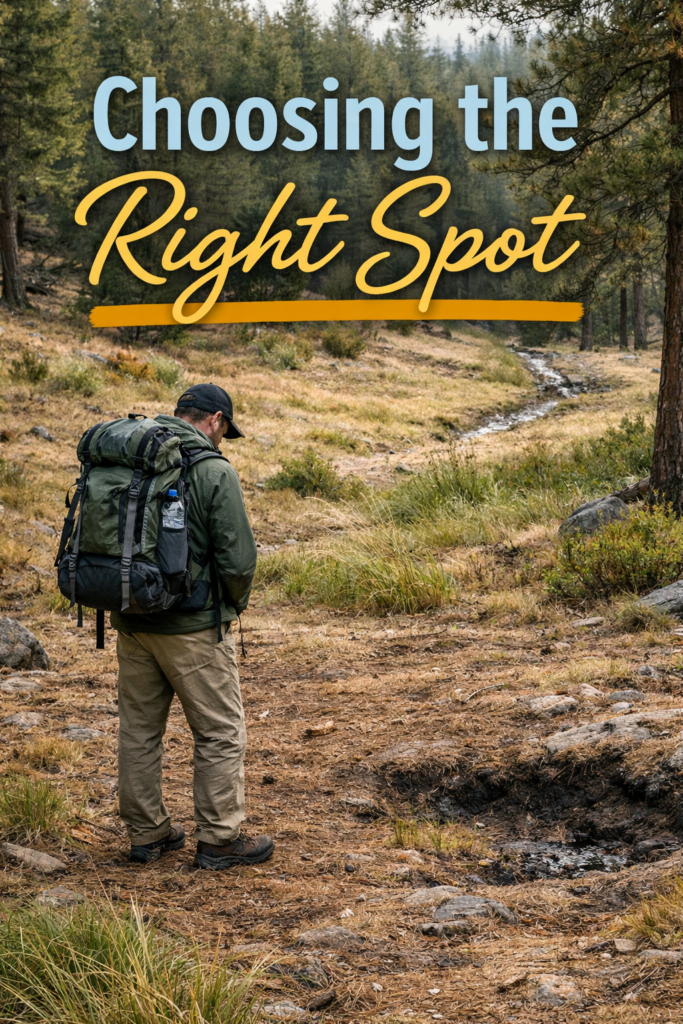
Flat Ground vs Slightly Sloped Ground (What Actually Works Best)
When I first started backpacking, I thought perfectly flat ground was the goal. It turns out a very slight slope is often better.
Completely flat spots can collect water if it rains, while a gentle slope helps water move away from your tent. I look for ground that feels level enough to sleep on but isn’t sitting in a dip or bowl.
Why You Should Avoid Low Spots, Wind Tunnels, and Runoff Areas
If an area looks unusually smooth or open, there’s usually a reason. Low spots collect rain, cold air, and morning condensation.
Wind tunnels—like gaps between trees or rock walls—can turn a calm night into a noisy one. I always imagine where rainwater would flow if it poured for an hour and make sure my tent isn’t in that path.
SEE THIS: Solo Backpacking for Women: Confidence-Boosting Tips and Outfit Ideas.
Tree Cover vs Open Terrain (Finding the Sweet Spot)
I like a little tree cover, but not too much. Trees can block wind and provide shade, which is great, but I never camp directly under large or dead branches.
In open terrain, I’m more careful with wind direction and guyline tension. The goal is protection without creating new risks.
Leave No Trace Choices That Still Feel Comfortable
Choosing a good campsite isn’t just about comfort—it’s about responsibility. I stick to established sites when possible, avoid trampling plants, and never clear an area just to make it “better.” A well-chosen spot should already work without needing to change the environment.
What Comes in a Backpacking Tent Kit
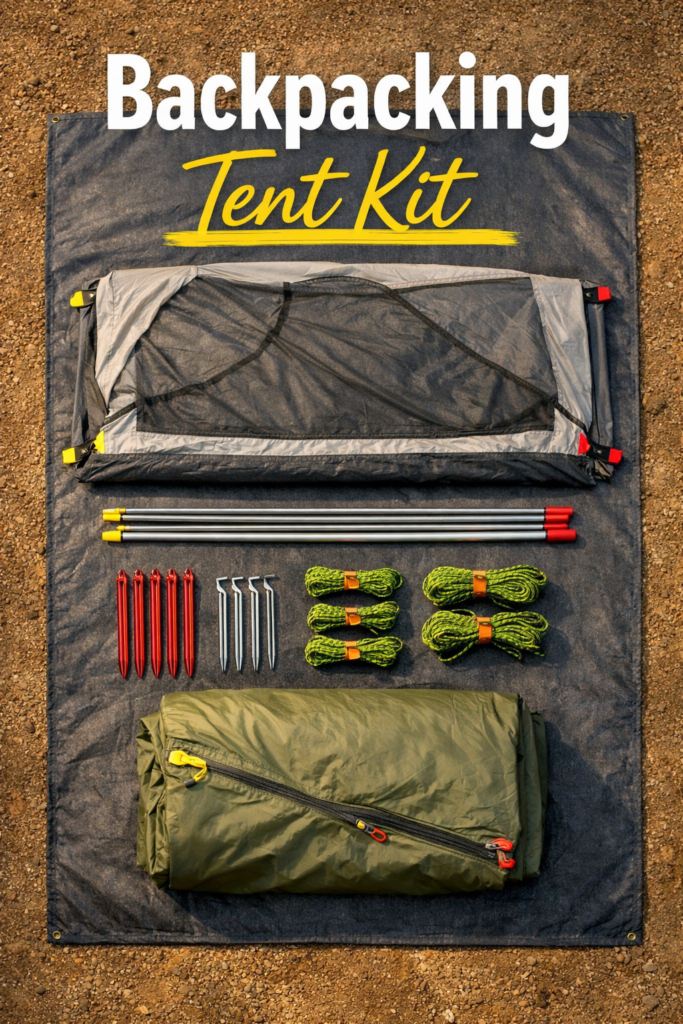
Before I start building my backpacking tent, I always take a minute to make sure I know what I’m working with.
Backpacking tents are designed to be lightweight and minimal, which means every piece has a purpose. Once you understand what each part does, setup becomes way less intimidating.
The Tent Body (Where You Actually Sleep)
The tent body is the main fabric part of the tent. Most backpacking tent bodies use a lot of mesh to keep weight down and airflow up.
I like to check which side the doors are on before I clip anything in, because flipping the tent the wrong way can make setup awkward later.
SEE THIS: How To Set Up A Tent In Nature (Complete Beginner-to-Confident Guide).
The Poles (Lightweight but Important)
Backpacking tent poles are usually shock-corded and break down into short sections. They feel flexible on purpose, but they’re not indestructible.
I always lay them out straight and let them connect naturally instead of snapping them together aggressively. Treating poles gently goes a long way.
Stakes (Small, Light, and Easy to Lose)
Tent stakes for backpacking are much lighter than car camping stakes, which also means they don’t forgive bad angles. I count them before setup and again before packing up.
Losing a stake in the dirt at dusk is a mistake you only make once.
Guylines and Tensioners (The Stability Pieces)
Guylines are the thin cords attached to the tent or rainfly. They’re easy to ignore in good weather, but they matter more than people think. I like to untangle them before I start so I’m not fighting knots later when the tent is already half-built.
The Rainfly and Vestibule Areas
The rainfly goes over the tent body and handles wind, rain, and condensation. Vestibules are the covered spaces outside the doors, and they’re perfect for boots and packs. Before setup, I check which side is the head and which is the foot so everything lines up correctly.
Optional Footprint or Ground Sheet
Not every backpacking tent includes a footprint, but many people use one anyway. A footprint protects the bottom of the tent and can extend its life. If I’m using one, I make sure it’s aligned exactly with the tent floor—no edges sticking out to catch rain.
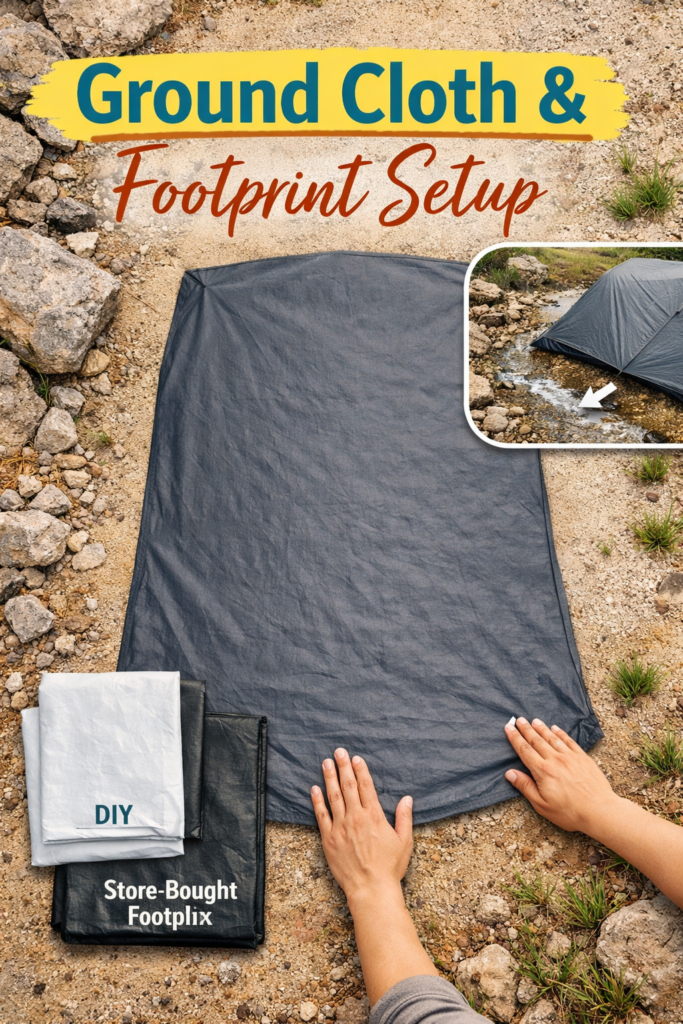
Ground Cloth & Footprint Setup (Optional but Smart)
When a Footprint Is Worth Carrying
If I know I’ll be camping on rocky ground, sandy soil, or wet terrain, I bring a footprint. It adds a small amount of weight but protects the bottom of the tent from abrasion and moisture. For longer trips or expensive ultralight tents, that extra protection feels like cheap insurance.
Store-Bought Footprint vs DIY Ground Cloth
Some tents come with a custom footprint made to fit perfectly. Those are easy and reliable, but you can also make your own ground cloth from materials like Tyvek or lightweight plastic.
I’ve used both. The key is keeping it lightweight and cut to the right size so it doesn’t stick out past the tent floor.
How to Position It So It Actually Works
This part matters more than people realize. I always lay the footprint down first and make sure it’s slightly smaller than the tent body.
If any edge sticks out, it can collect rain and funnel water underneath the tent. I line up the corners, smooth it flat, and then place the tent body directly on top.
Setting It Down Without Disturbing the Campsite
I avoid dragging the footprint around or clearing the ground aggressively. A quick brush of sticks or sharp rocks is usually enough.
The goal isn’t to create a perfect surface — it’s just to protect the tent while leaving the area looking untouched when I pack up.
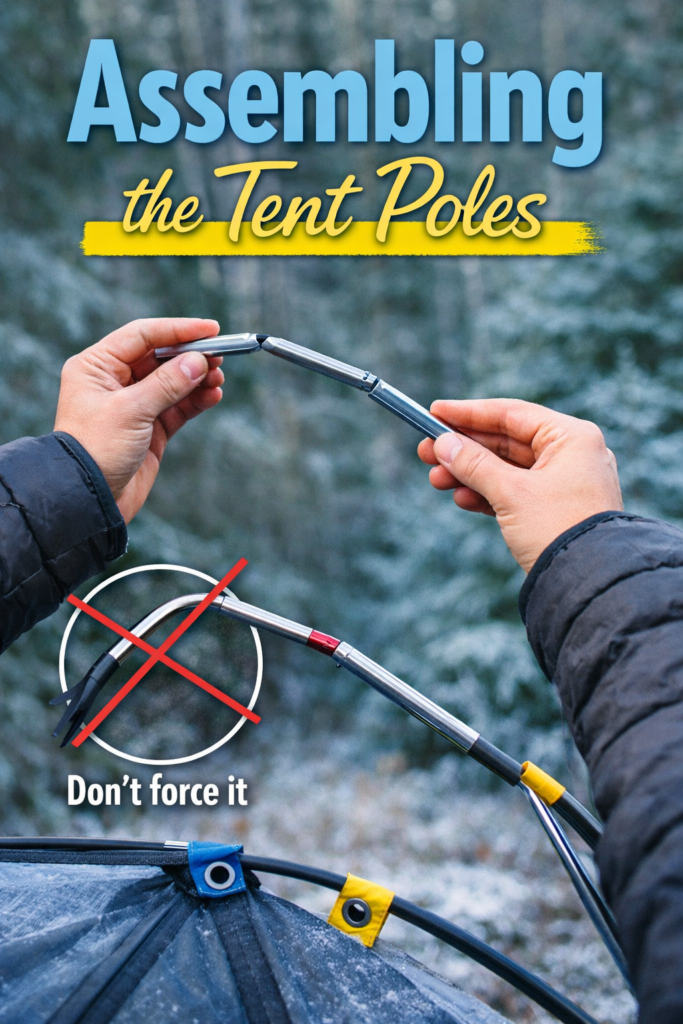
Assembling the Tent Poles Without Damage
This is the part where most beginners get nervous — and honestly, where most broken poles happen.
Backpacking tent poles are lightweight and flexible by design, but they still need a little respect. I’ve learned that slow and steady here saves a lot of frustration later.
Let the Shock-Cord Do the Work
Backpacking tent poles are held together by an internal shock-cord, which means they’re meant to snap together on their own.
I start by laying the pole sections out straight, then lift them gently and let the pieces guide themselves into place. I avoid pulling the cord tight or forcing sections together — that’s how cracks and weak spots start.
Start in the Middle, Not the Ends
One small habit that made a big difference for me was starting from the middle of the pole instead of the ends. Working outward evenly reduces stress on the cord and keeps the pole aligned. When I used to start at one end, I’d end up fighting the pole the entire time.
Don’t Force Bends That Feel Wrong
Tent poles are flexible, but they shouldn’t feel like they’re resisting you. If a bend feels sharp or awkward, I stop and double-check that I’m using the correct pole and that it’s routed properly. Forcing a pole into the wrong shape is one of the fastest ways to damage it.
Cold Weather Makes Poles More Fragile
In cooler temperatures, poles don’t flex as easily. I handle them more gently when it’s cold and avoid snapping them together quickly. Taking an extra minute here helps prevent small cracks that can turn into full breaks later.
Match Each Pole to the Right Place
Most backpacking tents use color-coded tips or sleeves to show where each pole belongs. I always take a second to match colors before threading or clipping anything. It’s a simple step, but it saves me from having to undo everything when the tent doesn’t sit right.
Attaching the Tent Body
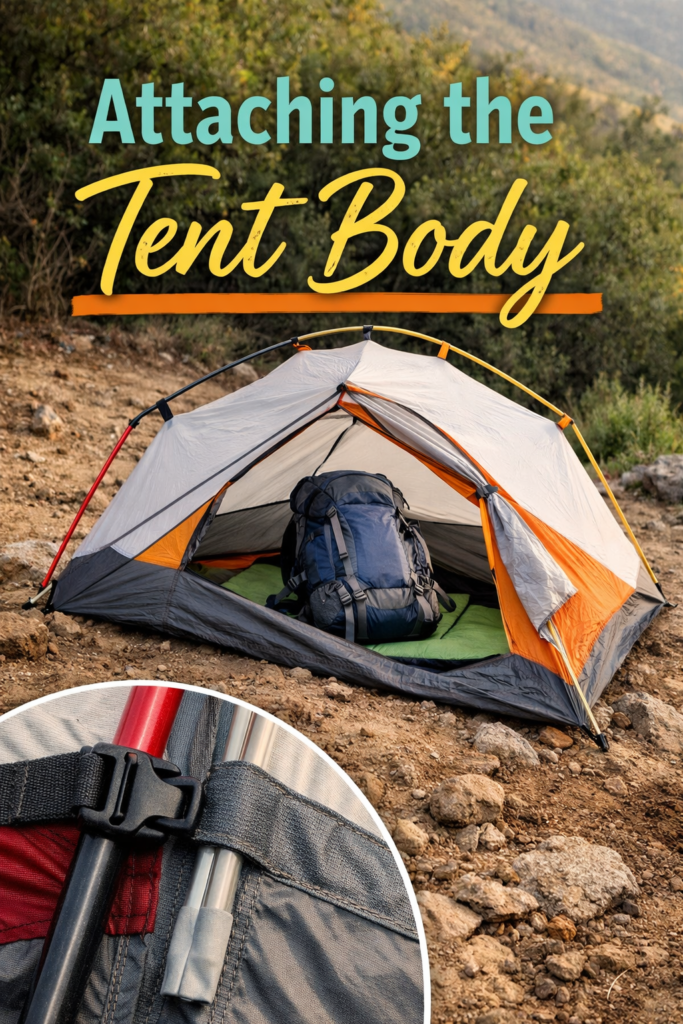
Clip Systems vs Sleeve Systems (What Yours Might Use)
Most modern backpacking tents use clips, sleeves, or a mix of both. Clip systems are quicker and easier, especially solo.
Sleeves take a little more patience but can feel sturdier in wind. I check which system my tent uses before starting so I’m not fumbling halfway through.
Attach One Corner at a Time
I start by securing one corner of the tent body to the pole, then move diagonally to the opposite corner. This keeps the tent from twisting or pulling unevenly. Working corner by corner helps the structure rise naturally instead of fighting against itself.
Keep the Tent From Sliding Around
Until the tent is staked, it likes to wander. If the ground is slick or uneven, I lightly step on a corner or place my pack inside the tent body to keep it from shifting while I clip or slide fabric into place.
Check Door and Vent Orientation Early
Before everything is fully attached, I pause and check which direction the doors and vents are facing. If the doors end up facing straight into the wind or downhill, I’ll regret it later. A quick adjustment now saves a full teardown.
Staking the Tent Securely (Even in Tough Ground)

The Right Stake Angle Makes a Huge Difference
I angle my stakes away from the tent at about 45 degrees. This gives them more holding power than pushing them straight down. I also make sure the guyline pulls directly against the stake instead of at an awkward angle.
How I Stake in Different Types of Ground
In forest soil, stakes usually go in easily with a firm push or a light tap from a rock. In sand or loose dirt, I bury the stake sideways or use a stick as a deadman anchor.
On rocky ground, I wedge stakes between rocks or tie guylines around solid stones instead of forcing anything.
What to Do When Stakes Won’t Go In
If a stake refuses to budge, I don’t fight it. I move it a few inches over and try again. Bent ultralight stakes are common when people force them into the wrong spot. Flexibility here saves gear.
Using Rocks Without Damaging Your Tent
When I use rocks for extra security, I place them on top of stakes or over guylines — never directly on the tent fabric. This adds weight and stability without risking tears or pressure points.
Adding the Rainfly Like a Pro
The rainfly is what turns a mesh tent into real shelter. I used to rush this step, especially when the sky looked clear, but the rainfly does more than block rain.
It manages wind, condensation, and temperature — and how you put it on actually matters.
Fly Orientation Mistakes Beginners Make
The biggest mistake I made early on was throwing the rainfly on without checking which end was which. Most rainflies are shaped differently at the head and foot, even if it’s subtle.
I always look for tags, buckles, or color-coded corners before attaching anything. Putting it on backward can block vents or leave doors awkwardly covered.
How I Align Vents With the Wind
Rainfly vents work best when they’re facing into the breeze, not away from it. I position the tent so wind can flow through the vents instead of pushing rain sideways into them. This small adjustment helps reduce condensation overnight and keeps the tent feeling less stuffy.
Creating Drip-Free Vestibules
Vestibules are one of my favorite features of a backpacking tent, but only when they’re set up correctly. I make sure the fly is fully tensioned and the vestibule zippers form clean angles.
If fabric sags, rain can drip right where you step in and out. A few seconds of adjusting makes a big difference.
Keeping the Inner Tent Dry During Rain Setup
If it’s raining while I’m setting up, I move fast but stay deliberate. I keep the inner tent packed until the last possible moment, then immediately cover it with the rainfly once it’s clipped in.
Some tents allow fly-first setup, which is a lifesaver in wet conditions. The goal is always the same: keep mesh dry and stress low.
Using Guylines for Wind, Storms, and Stability
Why Guylines Matter More Than You Think
Backpacking tents rely on tension to hold their shape. Guylines help spread that tension evenly, which reduces stress on poles and fabric. When I use them correctly, the tent feels quieter, more stable, and less likely to sag overnight.
When to Use Storm Mode vs Fair-Weather Mode
In calm conditions, I’ll sometimes use just the main guylines to keep things neat. If wind picks up or rain is expected, I switch to storm mode and use every available guy point. It takes a few extra minutes, but it’s worth it for peace of mind.
How I Tension Guylines Without Warping the Tent
The goal isn’t to crank everything as tight as possible. I tighten guylines just enough to smooth out fabric and create clean lines.
If poles start bending in strange ways or seams look stressed, I back off. A well-pitched tent feels firm, not forced.
Adjusting Guylines as Conditions Change
As temperatures drop and fabric relaxes, guylines can loosen. Before I crawl in for the night, I do a quick walk around and retighten anything that’s gone slack. This small habit has saved me from being woken up by flapping fabric more times than I can count.
Inside Setup: Turning a Backpacking Tent Into a Livable Space
Where I Place My Sleeping Pad and Bag
I always start with my sleeping pad. I line it up so my head is slightly uphill if there’s any slope at all. This helps with comfort and keeps me from sliding during the night. Once the pad is down, the sleeping bag naturally follows.
Keeping Gear Organized Without Blocking Airflow
Backpacking tents don’t have much floor space, so I’m picky about what stays inside. I keep only essentials near me — headlamp, water, phone, layers — and push everything else to the edges.
I make sure nothing blocks vents or presses against the tent walls, which helps reduce condensation.
Where Wet or Dirty Gear Should Go
Anything damp stays out of the sleeping area. Boots, rain gear, and packs go in the vestibule whenever possible.
If something has to come inside, I place it near the door on a ground cloth or stuff sack to keep moisture away from my sleep system.
Small Comfort Habits That Make a Big Difference
Before settling in, I fluff my sleeping bag, crack vents if the weather allows, and set my headlamp where I can find it in the dark. These tiny steps make the tent feel calm and intentional instead of cramped.
Common Backpacking Tent Setup Mistakes I’ve Learned the Hard Way
Pitching the Tent Too Tight or Too Loose
A tent that’s too loose flaps all night. A tent that’s too tight puts stress on poles and seams. I aim for smooth fabric and even tension, not a drum-tight pitch.
Ignoring Wind Direction
Wind almost always shifts overnight. If I don’t think about it during setup, I usually regret it later. Pointing the tent’s narrow end or vestibule into the wind makes a noticeable difference.
Skipping Guylines Because the Weather Looks Fine
Clear skies don’t mean calm nights. I’ve learned to at least set the main guylines, even when the forecast looks perfect. It’s easier than fixing problems at 2 a.m.
Choosing Convenience Over a Good Campsite
When I’m tired, it’s tempting to stop at the first open spot. Every time I’ve done that, I’ve paid for it with poor sleep, condensation, or wind exposure. A few extra minutes of scouting is always worth it.
How to Take Down and Pack a Backpacking Tent
Letting Moisture Dry Before Packing
If I have time, I let the tent air out for a few minutes before packing. Even a short break helps shake off overnight condensation. When everything goes into the stuff sack wet, mildew becomes a real problem later.
The Order I Pack Things Up
I start by removing guylines and stakes, then take off the rainfly. The tent body comes next, followed by the poles. Packing in the same order every time keeps things organized and prevents small pieces from getting lost.
Folding vs Stuffing (What I Actually Do)
Most backpacking tents are designed to be stuffed, not folded. Stuffing reduces repeated crease lines that can weaken fabric over time. I loosely roll poles separately and slide them into their own sleeve or side pocket.
Keeping Dirt and Debris Out of the Tent
Before packing, I give the tent body a gentle shake to remove dirt, pine needles, or sand. This keeps grit from grinding into the fabric and zippers during transport.
Caring for Your Backpacking Tent Long-Term
Drying Your Tent Properly After Trips
As soon as I get home, I unpack my tent and let it fully dry — even if it looked dry when I packed it. Mesh, seams, and corners hold moisture longer than you think.
Smart Storage That Prevents Damage
I never store my tent tightly compressed for long periods. Instead, I keep it loosely packed in a breathable bag or hung in a closet. This protects the fabric and keeps the shock-cord from losing elasticity.
When to Repair Instead of Replace
Small tears, loose seams, and bent stakes are usually fixable. Carrying a basic repair kit has saved me from replacing gear unnecessarily. Most damage gets worse only when ignored.
Simple Habits That Extend Tent Life
I avoid dragging my tent across the ground, always use a ground cloth when possible, and treat zippers gently. These small habits add up and keep my tent reliable trip after trip.
Quick Backpacking Tent Setup Checklist (Save This)
When I’m tired, cold, or setting up close to sunset, this is the checklist I run through in my head. It keeps me from skipping small steps that turn into big problems later.
If you’re short on time, this section alone can save your setup.
Campsite Basics
Ground is mostly flat with a slight slope
Not in a low spot or runoff path
Wind direction checked
Fragile plants left untouched
Tent Foundation
Ground cloth or footprint laid flat
No edges sticking out beyond the tent floor
Tent body centered and aligned
Poles and Structure
Poles fully seated and gently assembled
Correct poles matched to correct spots
Tent body clipped or sleeved evenly
Staking and Stability
Stakes angled away from the tent
Corners secure before tightening
Guylines attached and lightly tensioned
Rainfly Setup
Rainfly oriented correctly (head vs foot)
Vents aligned with the breeze
Vestibules zipped and tensioned cleanly
Final Comfort Check
Sleeping pad positioned comfortably
Gear organized without blocking airflow
Wet items stored in vestibules
Headlamp, water, and essentials within reach.
Building Confidence One Setup at a Time
Learning how to build a backpacking tent isn’t about memorizing steps or doing everything perfectly. It’s about slowing down, paying attention, and trusting yourself enough to adjust as you go.
Every time I set up my tent, I get a little faster, a little calmer, and a lot more confident — not because the process changed, but because my mindset did.
There will be nights when the ground isn’t ideal, the wind shifts, or the rain shows up earlier than expected. That doesn’t mean you did anything wrong.
It just means you’re out there learning. A well-built backpacking tent isn’t just shelter — it’s a quiet space at the end of a long day, a reset button, and a reminder that you’re capable of taking care of yourself outdoors.
The more you practice, the more natural it feels. One day, you’ll realize you’re setting up without thinking twice — and that’s when camping starts to feel less like a challenge and more like home.