You don’t need to drop a fortune at the home decor store to make your Thanksgiving table look like something out of a magazine. Most of those expensive holiday displays you see are just clever combinations of dollar store finds and things you probably already have lying around.
I’ve been styling seasonal setups for years, and I can tell you that the difference between cheap and chic comes down to how you arrange things, not how much you spend.
A few mason jars, some battery-powered lights, and painted pumpkins can look just as impressive as a $200 centerpiece if you know what you’re doing. These 15 projects show you exactly that.

Contents
- 1 Battery-Operated String Lights Wrapped Around Door Frames and Mirrors
- 2 Fairy Light-Filled Glass Jars With Acorns and Mini Pumpkins
- 3 Grouped White Pillar Candles on a Decorative Tray
- 4 Wine Bottle Candle Holders Wrapped in Twine
- 5 Stacked Mini Pumpkin Topiary on a Painted Candlestick
- 6 Natural Corn Husk Centerpiece With Decorative Grasses
- 7 Shallow Bowl Filled With Painted Pinecones and Dried Citrus
- 8 Metallic-Painted Mini Pumpkins Clustered on a Tray
- 9 Fall Foliage Branches in Tall Vases as Statement Pieces
- 10 Wooden Crate Filled With Gourds and Dried Wheat Stalks
- 11 Layered Tablecloth With Burlap or Plaid Runner
- 12 Cloth Napkins Tied With Twine and Faux Greenery Sprigs
- 13 Upcycled Glass Jars Painted and Filled With Seasonal Items
- 14 Leaning Tower of Painted Foam Pumpkins for Mantel Display
- 15 DIY Leaf Garland Draped Over Windows and Doorways
Battery-Operated String Lights Wrapped Around Door Frames and Mirrors
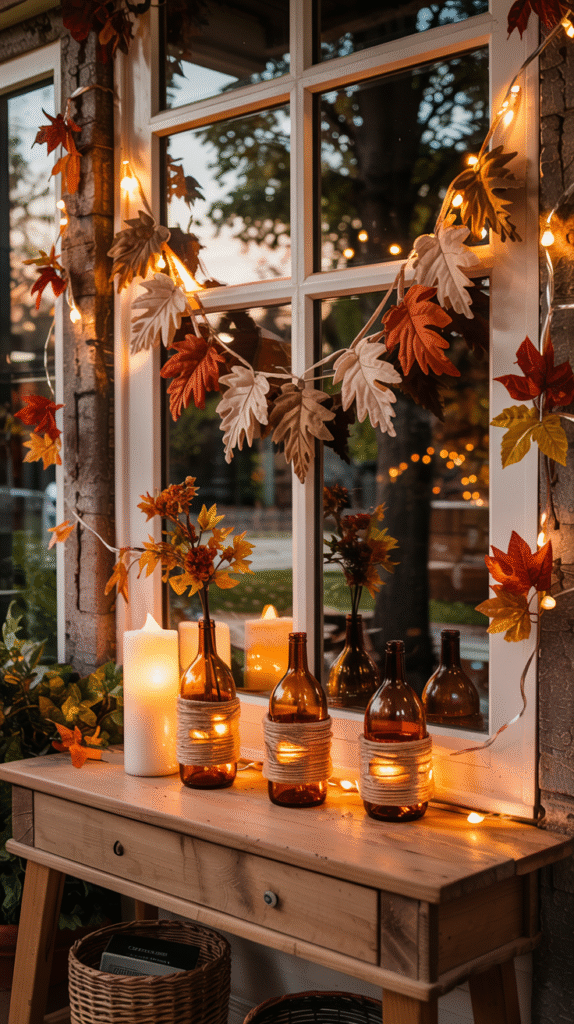
String lights are about the easiest win in holiday decorating because they work anywhere and don’t require you to hunt for an outlet. I always grab the LED versions since they stay cool enough to leave on all day without worrying about anything melting or catching fire.
The fall-themed ones with little maple leaves or pumpkins mixed in look way better than plain white bulbs, especially if you’re going for that cozy harvest vibe. You can usually find multi-packs for ten to twenty bucks, which is enough to light up your entire downstairs.
Fairy Light-Filled Glass Jars With Acorns and Mini Pumpkins
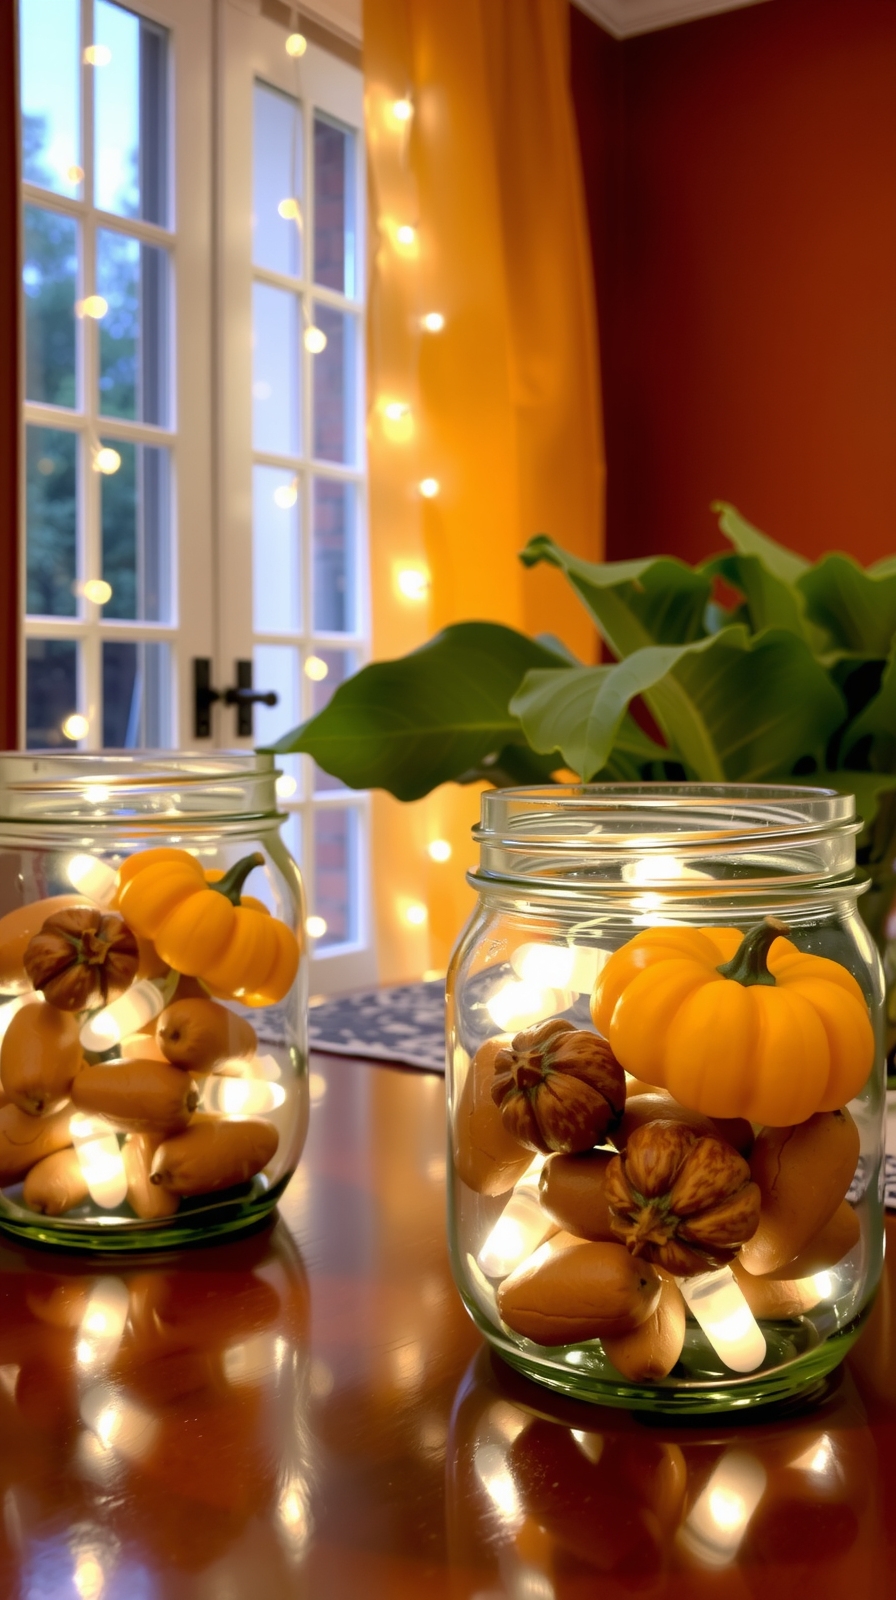
Mason jars stuffed with fairy lights and natural bits look complicated but take maybe ten minutes to put together. Drop a battery-operated string light into any clear jar you’ve got, then fill the space around it with acorns, tiny pumpkins, or pinecones you picked up on your last walk.
If you want to get fancy, brush some gray chalk paint on the outside for that weathered farmhouse look everyone’s been into lately. Flip the whole thing upside down so the battery pack sits flat on the bottom, and suddenly you’ve got a glowing centerpiece that looks like you spent real money on it.
Grouped White Pillar Candles on a Decorative Tray
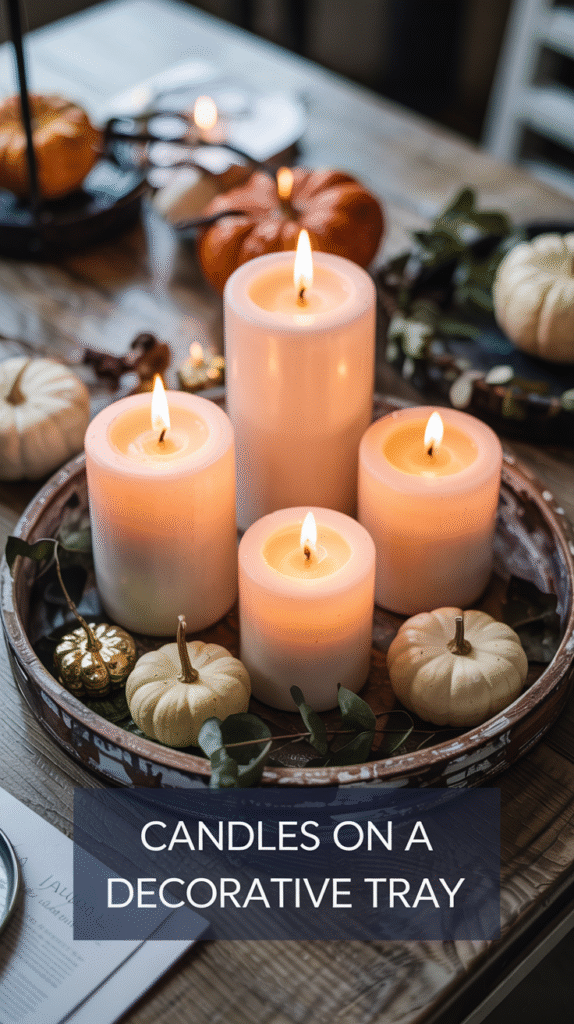
There’s something about white candles clustered together that just reads as expensive, even when you bought them at the grocery store. Grab a distressed wooden tray (the kind with visible grain and a whitewashed finish works best) and arrange your candles in groups of three or five.
Tuck some mini pumpkins or dried leaves around the bases to fill the gaps, and you’ve got a centerpiece that works on a coffee table or kitchen counter. The varying heights matter more than you’d think for making the whole thing look intentional instead of random.
Wine Bottle Candle Holders Wrapped in Twine
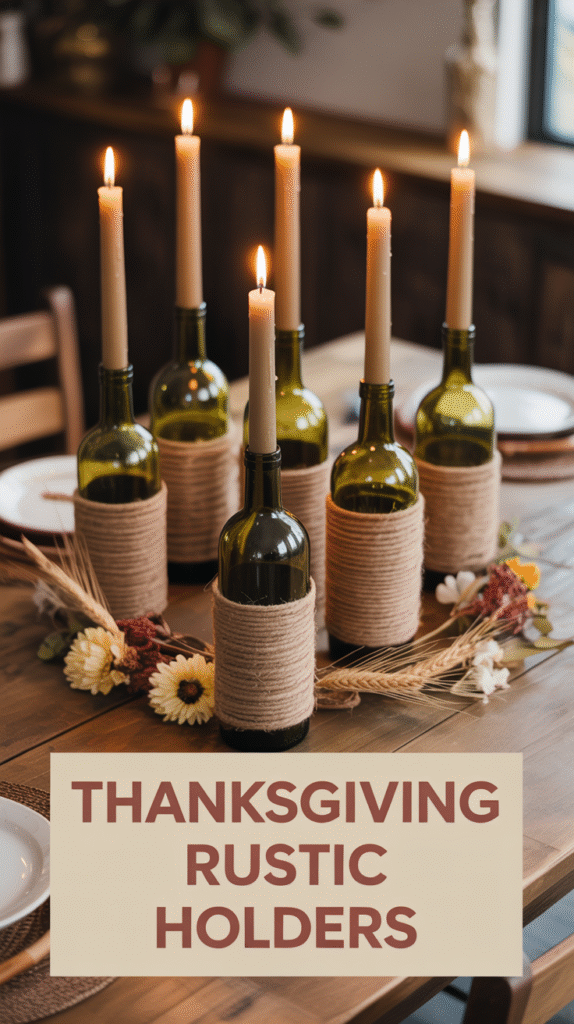
Empty wine bottles sitting in your recycling bin are about to become your new favorite candleholders. Start wrapping twine tightly from the neck down, using a dab of permanent adhesive every few inches to keep everything in place.
Once you’ve covered the bottle, hot glue some dried flowers or a scrap of ribbon near the top for a seasonal touch. Stick a taper candle in the opening and let the wax drip down as it burns, which creates these cool organic patterns that make each bottle look like a one-of-a-kind piece.
Stacked Mini Pumpkin Topiary on a Painted Candlestick
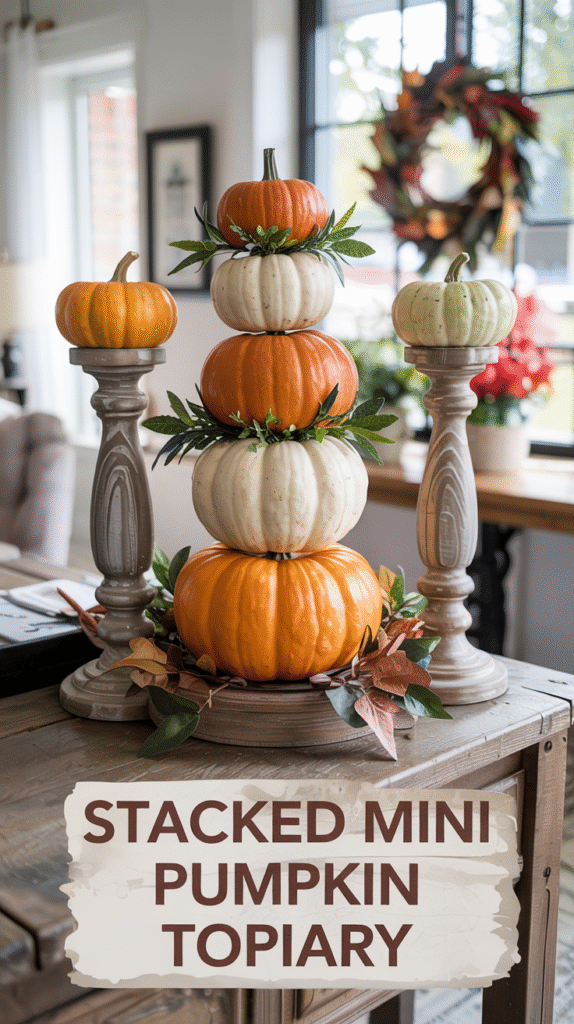
A pumpkin tower sitting on an old candlestick looks way harder to make than it actually is. Pop the stems off your dollar store pumpkins with a butter knife, then hot glue them together from biggest to smallest on top of whatever candlestick you found at the thrift store.
The whole project takes less time than brewing coffee and costs under eight dollars if you’re starting from scratch. Spray paint the candlestick first if you want everything to match, or leave it shabby for that vintage look that’s always in style.
Natural Corn Husk Centerpiece With Decorative Grasses
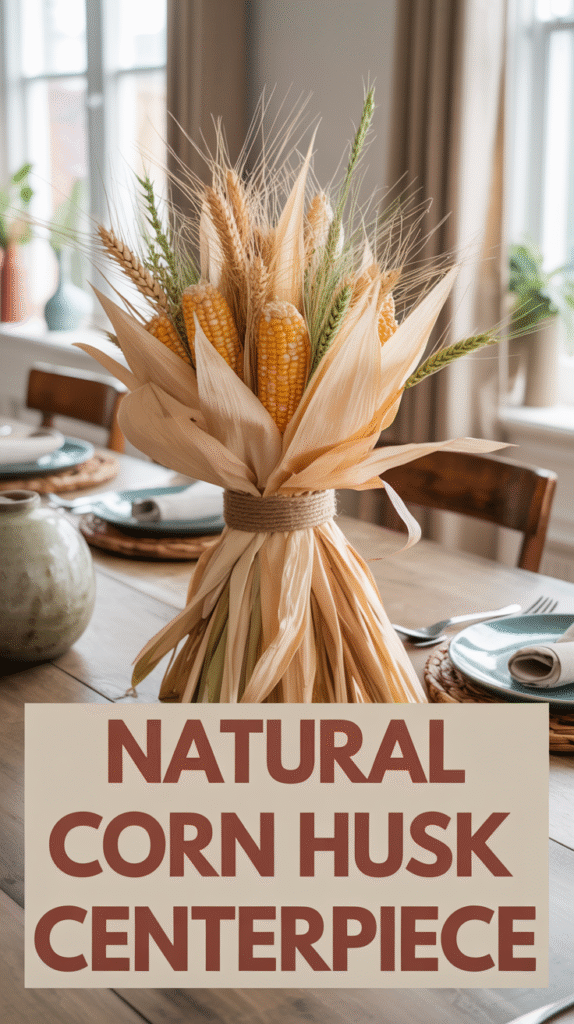
Corn husks make surprisingly elegant centerpieces once you soften them up in warm water and trim them into leaf shapes. Bundle them together with decorative grasses like dried barley or whatever seed heads you can find growing wild near your house.
Secure everything with floral wire or basic twine, layering the materials so you get some depth instead of a flat bunch. A quick coat of clear spray varnish keeps everything from falling apart and adds just enough shine to make it look polished without being fussy.
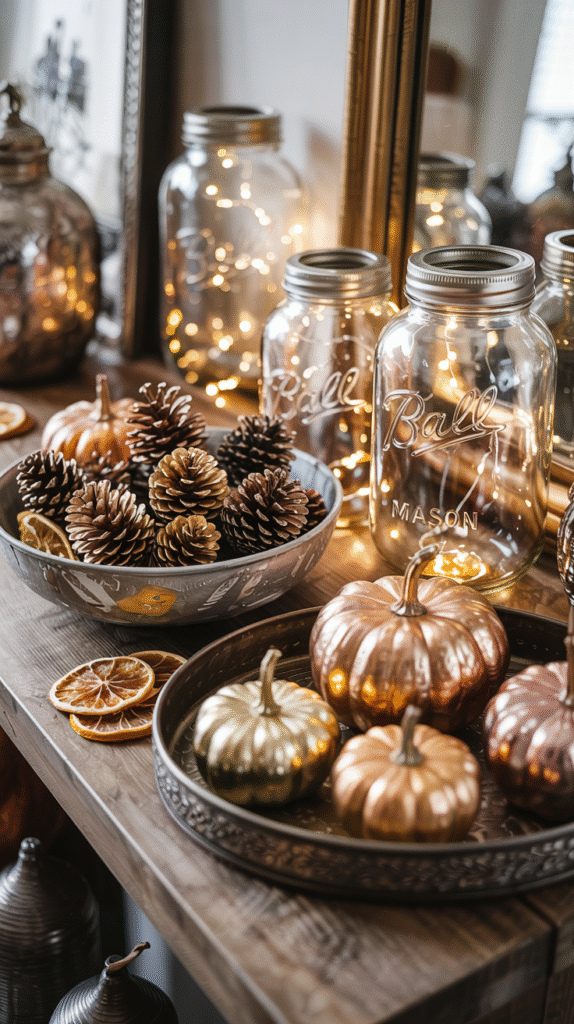
Shallow Bowl Filled With Painted Pinecones and Dried Citrus
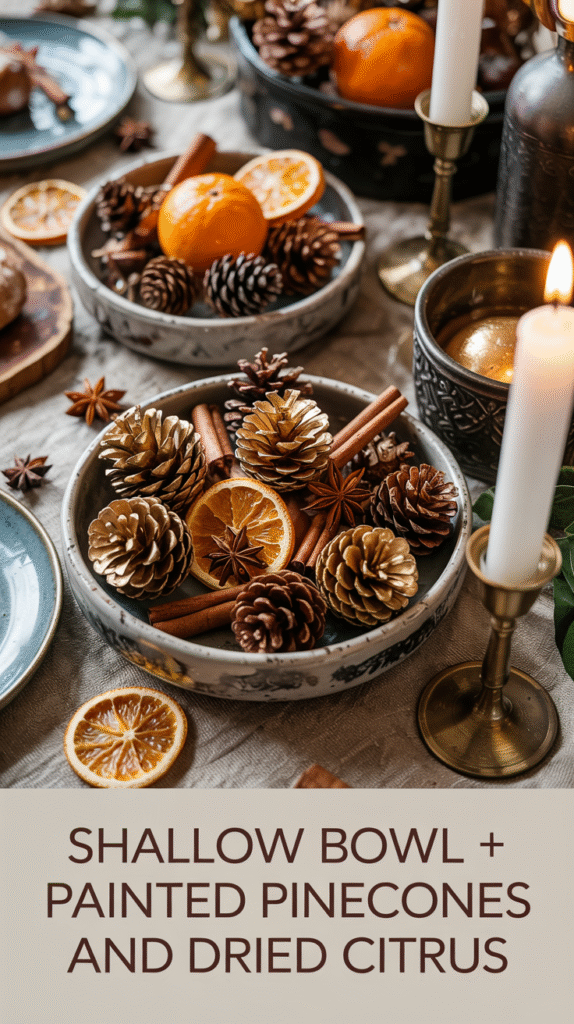
Pinecones sprayed with metallic paint and dried orange slices arranged in a bowl are one of those combinations that photograph really well and cost almost nothing. Rinse your pinecones in vinegar water first, then bake them low and slow until they’re completely dry and opened up.
Hit them with gold, copper, or silver spray paint, depending on what you’re going for, then layer them in a wide shallow bowl with citrus slices you dried in the oven. The oranges and lemons need to bake at 140 degrees for a few hours until they get leathery and translucent, which brings out these gorgeous amber tones.
Metallic-Painted Mini Pumpkins Clustered on a Tray
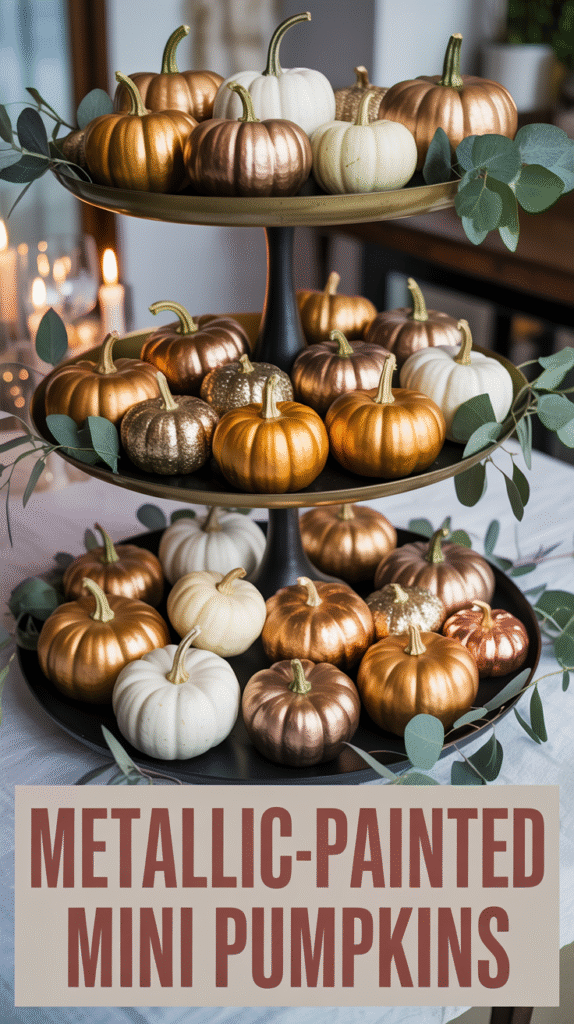
Fake pumpkins from the craft store become instant conversation pieces once you spray them metallic. Two or three thin coats of bronze, gold, or copper paint cover way better than one thick coat that drips everywhere.
Let each layer dry completely before adding the next one, and finish with clear spray to seal everything so the paint doesn’t chip off when someone inevitably picks one up. Mixing different metallic finishes on one tray looks more interesting than sticking to a single color, and grouping them in odd numbers keeps your eye moving around instead of settling in one spot.
Fall Foliage Branches in Tall Vases as Statement Pieces
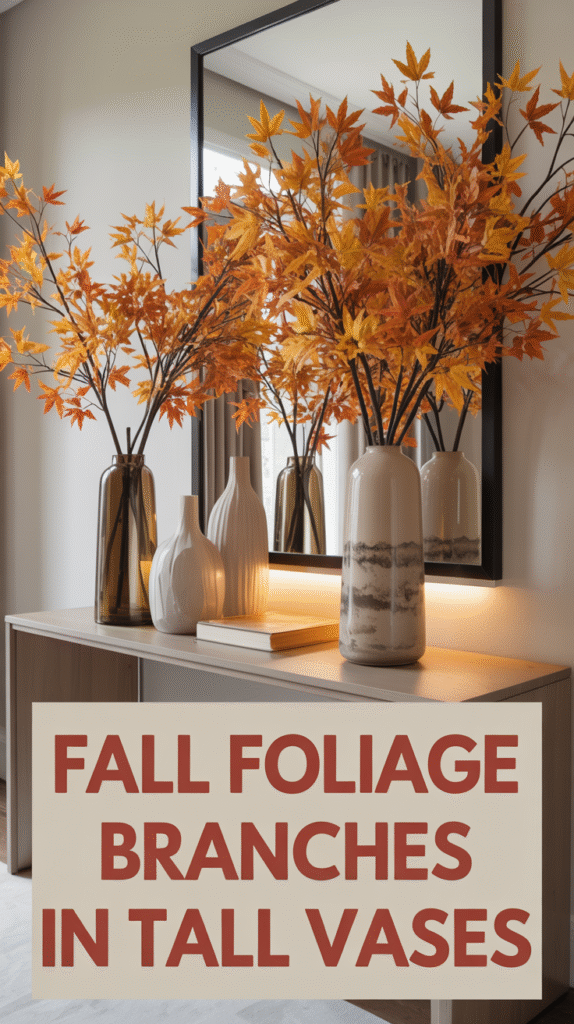
Tall branches stuck in vases create drama without requiring any real skill or expensive flowers. Look for branches with natural curves when you’re out walking, or grab some curly willow from the craft store if you want something more sculptural.
The general rule is to let your branches stick up about one and a half to two times the height of the vase, which keeps everything balanced instead of top-heavy. Drop some floral mesh in the bottom of the vase to hold your branches where you want them, and you’re done.
Wooden Crate Filled With Gourds and Dried Wheat Stalks
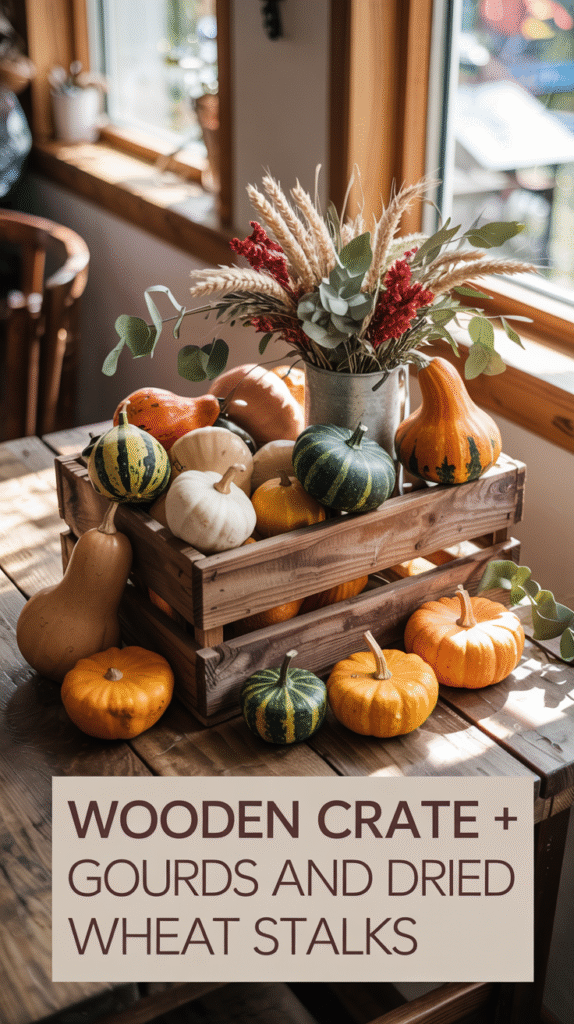
An old wooden crate packed with gourds and wheat stalks gives you that contained farmhouse look without the mess of loose decorations rolling around. Stuff some crumpled kraft paper in the bottom for filler, then layer in a scarf or fabric scrap that picks up colors from your room.
Arrange your pumpkins, gourds, and wheat at different heights with the taller pieces toward the back, tucking in some eucalyptus stems or acorns to fill gaps. The whole setup stays put during dinner and looks like you hired someone to style it.
Layered Tablecloth With Burlap or Plaid Runner
Running a burlap or plaid strip down the middle of your tablecloth instantly makes everything look more put-together. Measure your table and add about two feet to the length so you get a decent drape on both ends, cutting the width roughly half as wide as your table.
Iron everything before you lay it down because wrinkles ruin the effect faster than anything else. You can cross two runners perpendicularly if you want to get creative, or just center one lengthwise and call it done.
Cloth Napkins Tied With Twine and Faux Greenery Sprigs
Cloth napkins wrapped with twine and tucked with fake greenery turn a basic place setting into something guests actually comment on. Cotton or linen in busy patterns hides stains better than solid colors, which matters when you’re dealing with gravy and cranberry sauce.
Hem the edges if you’re feeling ambitious, or just use iron-on adhesive to keep them from fraying. Loop twine around each folded napkin and slide a small sprig of faux eucalyptus or rosemary under the string, which takes about thirty seconds per napkin and looks intentional.
Upcycled Glass Jars Painted and Filled With Seasonal Items
Those pasta sauce jars you’re about to toss can become decent fall decorations with one coat of chalky paint. Wash them thoroughly, then brush on thin layers of orange, red, or yellow until you get solid coverage.
Wrap jute twine around the neck once the paint dries, then fill them with fake fall flowers, pinecones, or just drop a tea light inside for ambient lighting. Line up several jars along your mantel or down the center of your table for a cohesive look that costs you basically nothing.
Leaning Tower of Painted Foam Pumpkins for Mantel Display
Foam pumpkins stacked and leaned against each other on your mantel create height and interest without taking up much depth. Glue them together with wood glue, varying the sizes as you stack, so the whole thing looks intentional instead of accidental.
Chalk paint in cream, gold, or muted pastels reads more sophisticated than straight orange, especially when you seal it with Mod Podge for that smooth ceramic finish. Secure the bottom with a non-slip mat so nothing topples over, and tuck some artificial flowers between the layers if you’ve got gaps to fill.
DIY Leaf Garland Draped Over Windows and Doorways
Leaf garlands strung over doorways and windows add color without permanent commitment since you can take them down the day after Thanksgiving. String your jute cord first, then attach felt or burlap leaf shapes with clothespins or hot glue, depending on whether you want to reuse the cord later.
Real leaves dipped in wax last longer than you’d think, or you can cut shapes from cardstock if you’ve got a printer and some free time. Adding gratitude leaves where people write what they’re thankful for turns decoration into an activity, which saves you from awkward silences when the family runs out of small talk.