You’re probably just letting all that valuable real estate sit empty behind cabinets, deep under the bed, or even inside those little wall cavities.
Imagine how much better your mobile life would be if you could magically make all that room appear.
The best part? These incredible DIY slide-out mods don’t require you to be a master carpenter (thank goodness!) or shell out a ton of cash on fancy materials.
Nope! But they absolutely have the power to essentially double your usable storage. These DIY slide-out modifications don’t require professional carpentry skills or expensive materials, yet they’ll double your usable storage.
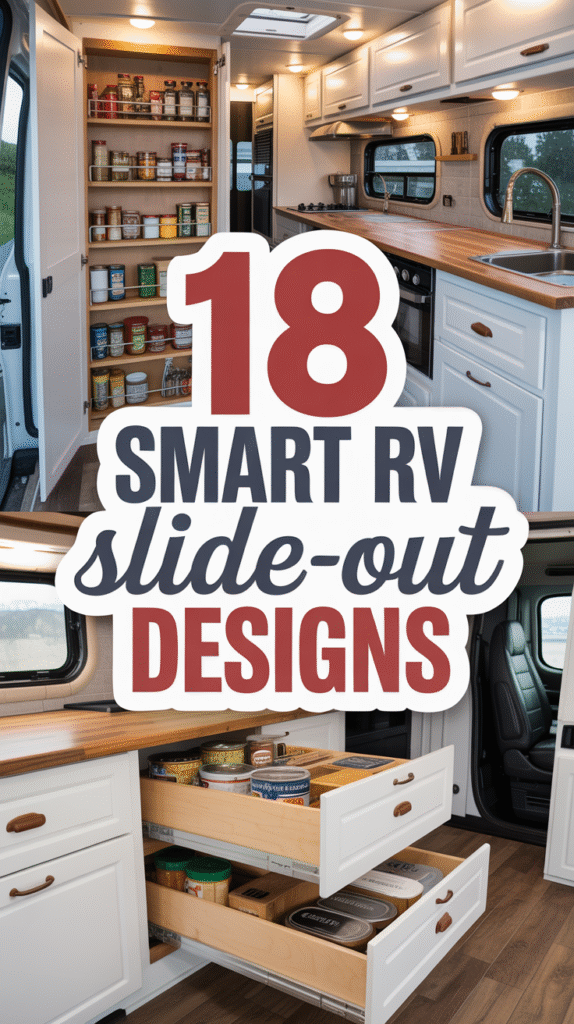
The secret lies in understanding which areas of your camper can accommodate these ingenious sliding mechanisms. Let’s dive into 18 brilliant slide-out hacks that will make space magically appear in your home on wheels.
Build Under-Bed Slide-Out Storage Drawers for Clothing and Linens
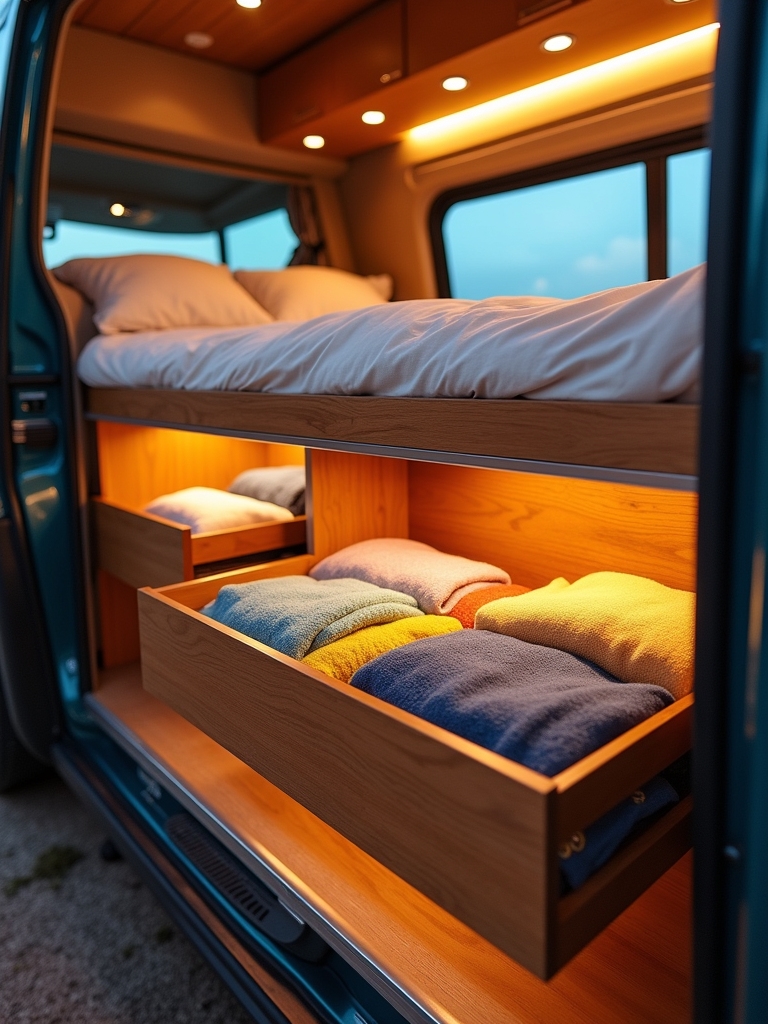
When you’re living in a camper van, every square inch of storage space counts. That’s why the area under your bed is usually one of the most overlooked, underutilized spots in the whole place. It’s like prime real estate that’s just sitting there waiting.
That neglected zone under the bed? It’s just begging to be transformed into beautifully organized storage, and the best part is, it’s simple!
All you need to do is build some rugged slide-out drawers using basic plywood boxes, attach some quality, heavy-duty ball-bearing slides (seriously, don’t skimp on the hardware!), and you’re good to go with your basic tools.
Speaking of smart ideas, as someone who designs spaces for a living, I’ve noticed a major trend: savvy RV enthusiasts are ditching those boring, bulky traditional bed frames entirely.
They are swapping them out for cool, storage-focused furniture pieces that really max out the vertical space. It’s just brilliant design, and it’s a total game-changer for keeping your mobile bedroom blissfully clutter-free!
Create Pull-Out Pantry Shelves in Narrow Kitchen Cabinets
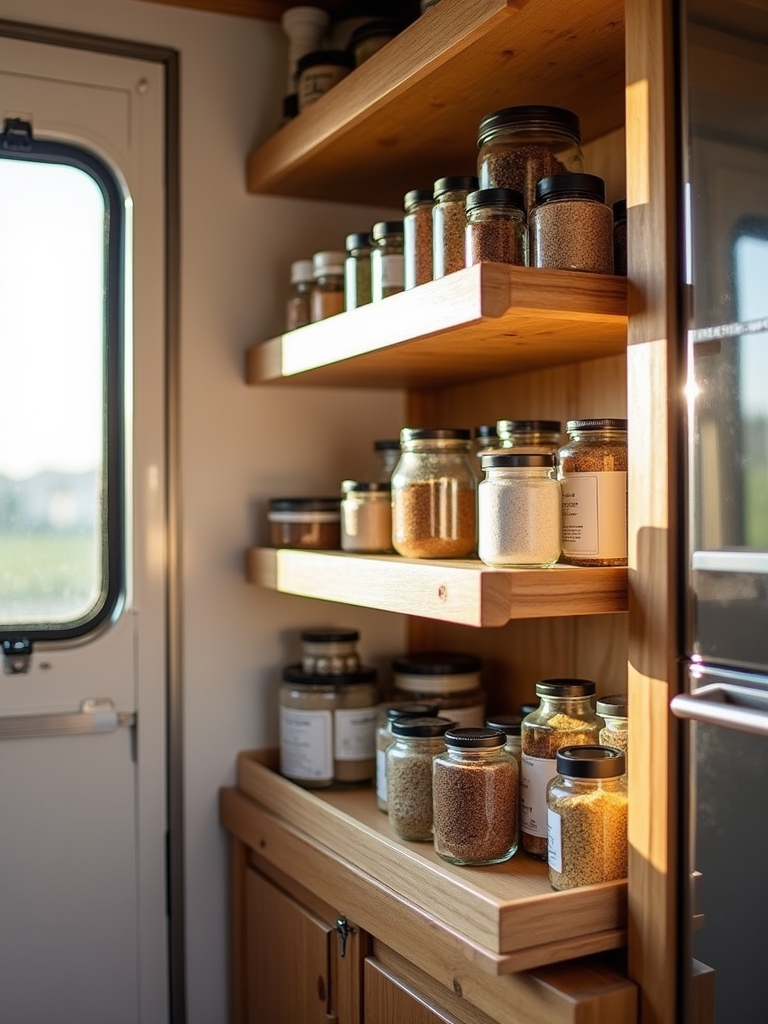
If you’ve ever struggled to find that can of beans buried in the back of your camper’s narrow kitchen cabinet, you’ll appreciate how pull-out pantry shelves can revolutionize your cooking space.
First things first, you’ve got to measure the inside of that cabinet super carefully. Make sure you subtract about an inch so you have room for the drawer slides.
Good news: those standard 18-inch drawer slides that people use for home kitchen installs work perfectly for most camper setups!
Just build shallow drawer boxes using 1×6 pine boards and plywood for the bases, and then mount those full-extension slides. It brings everything right to the front for smooth, accessible storage.
Install Sliding Tool Organizers in Exterior Compartments

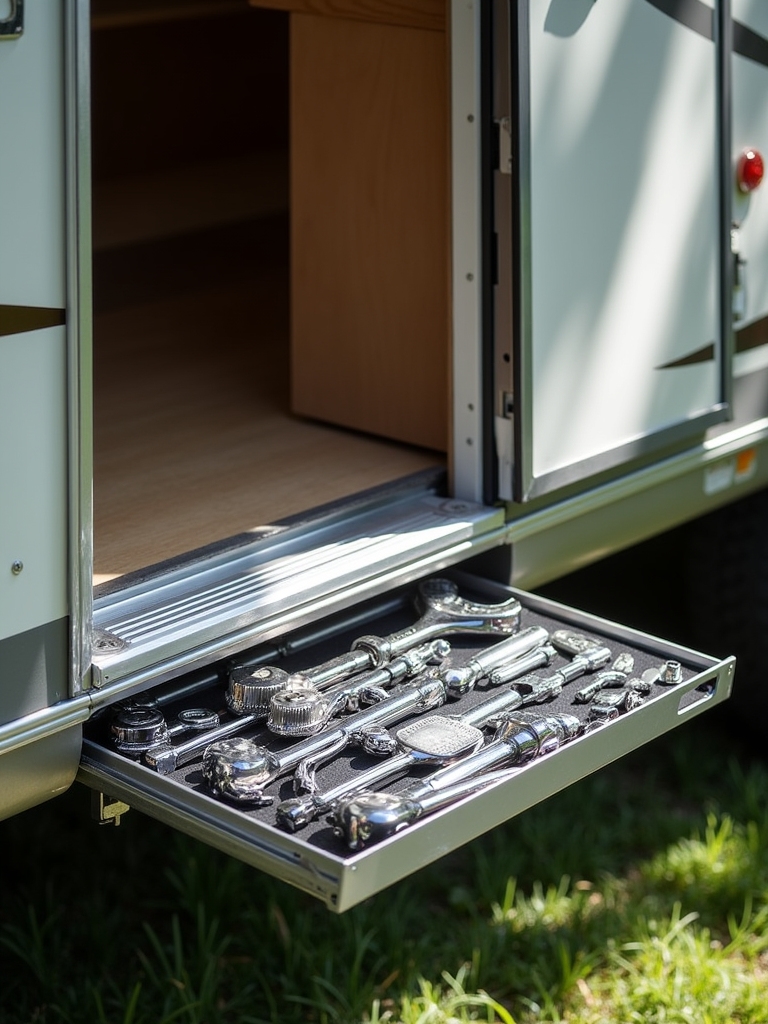
Your exterior storage compartments likely hide a jumbled mess of tools that tumble out whenever you open the door. Does anyone else get immediately annoyed by that?
Let’s turn those chaotic spaces into something amazing with sliding organizers. Just build pull-out trays from ⅝”-inch plywood and grab some solid 500-pound-rated drawer slides.
This lets you really maximize the depth, keep all your gear separated efficiently, and, best of all, eliminates the need for any dangerous reaching and digging.
These simple DIY slide-outs instantly turn a frustrating zone into an organized, accessible tool station. It saves time and keeps your fingers safe.
Construct Hidden Floor Storage Trays Beneath Dinette Seating
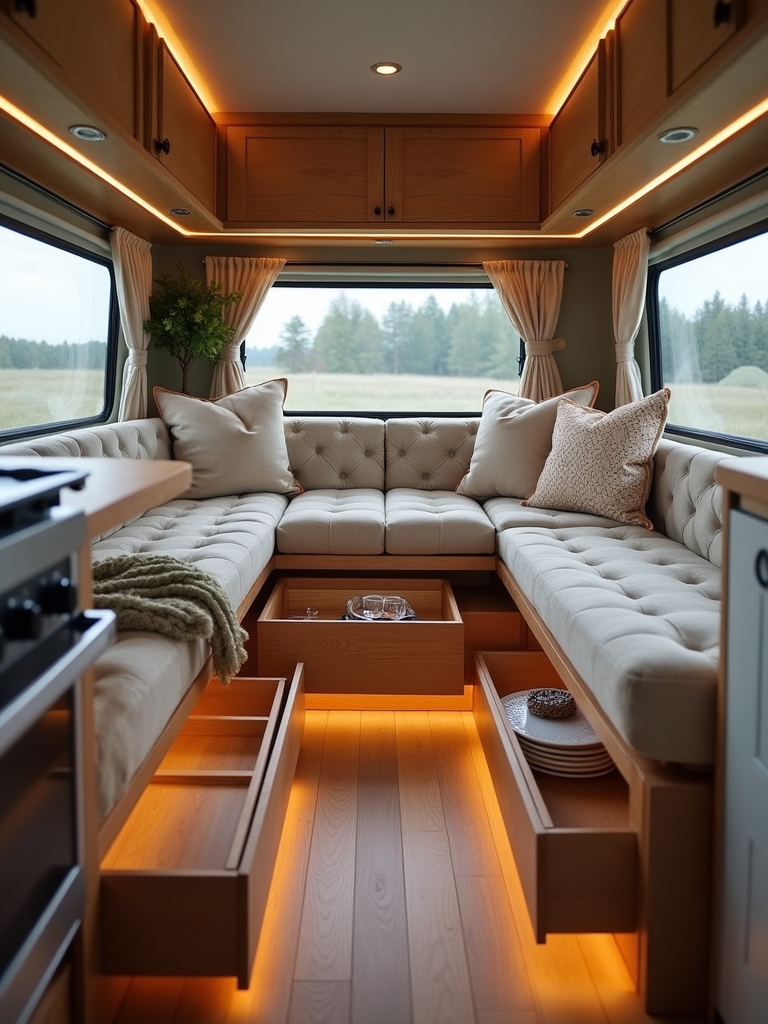
Remember that unused cavity right beneath your dinette seating? That’s seriously prime real estate for custom storage solutions that will totally change the game for organizing your camping gear.
Before you start cutting any plywood for the sliding trays, you absolutely need precise measurements of that dinette base. When you install the drawer slides, take extra care to avoid any existing wiring or structural elements hiding underneath (safety first).
Once they’re mounted, add some sleek handles for easy access, and then you can either paint or carpet those finished trays to match your RV’s interior perfectly. Hello, custom storage!
Add Slide-Out Cutting Board Extensions to Kitchen Counters
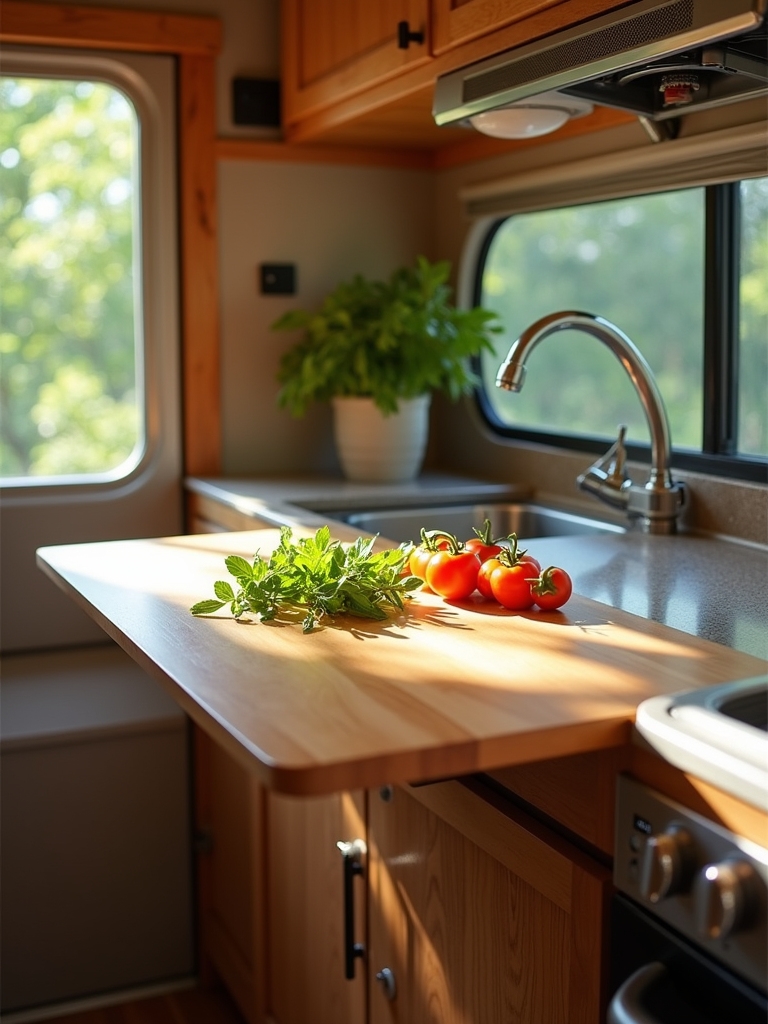
If you’re like me and feel perpetually cramped in that little RV kitchen, you are going to love this. Transform your workspace with a slide-out cutting board extension. It’s the extra prep area you’ve been dreaming of.
To pull this off, you’ll need a few key things: some robust, heavy-duty folding brackets or solid drawer slides, a nice slab of quality hardwood or butcher block (it just feels so much nicer than laminate, trust me), and your basic toolkit.
Make sure you mount the hardware super securely into reinforced backing boards. Then, just finish the wood with a good coat of food-safe oil, and voilà!
You’ve instantly created valuable, functional counter space for usually under fifty bucks. It’s a classic interior design trick for tiny kitchens, and it works perfectly on the road.
Design Pull-Out Shoe Racks for Entryway Closets
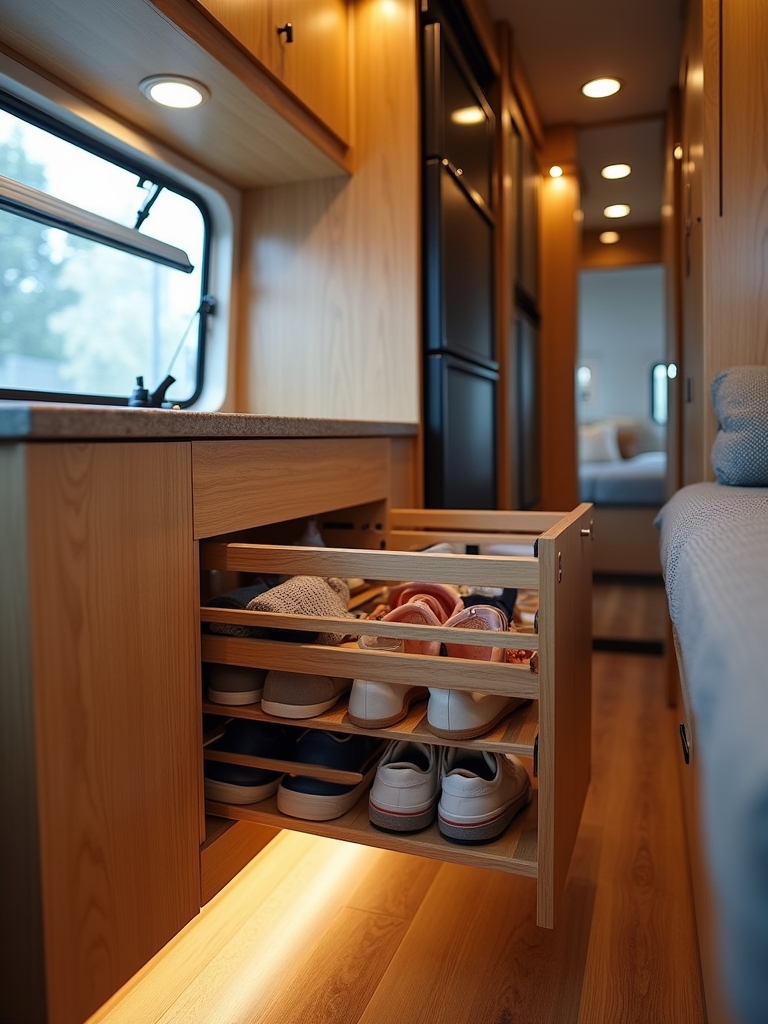
Is there anything more frustrating than cluttered shoes scattered all over your RV’s entryway? It just creates instant chaos and wastes what little floor space you have.
You can banish that mess and completely transform that cramped closet.
The good news is, you can totally conquer that mess and transform that cramped closet space! Just build some simple, sturdy pull-out racks using some affordable 1×12 lumber and those incredibly handy full-extension drawer slides.
To keep things neat, install vertical dividers, these create organized little cubbies for each pair.
Pro tip for keeping it fresh: add removable, angled shelves so you can easily pull them out for cleaning.
These awesome space-saving racks are fantastic at utilizing those narrow closet depths efficiently, ensuring all your footwear is accessible but neatly tucked away and secure while you’re moving down the highway.
Make Sliding Bins for Basement Storage Compartments
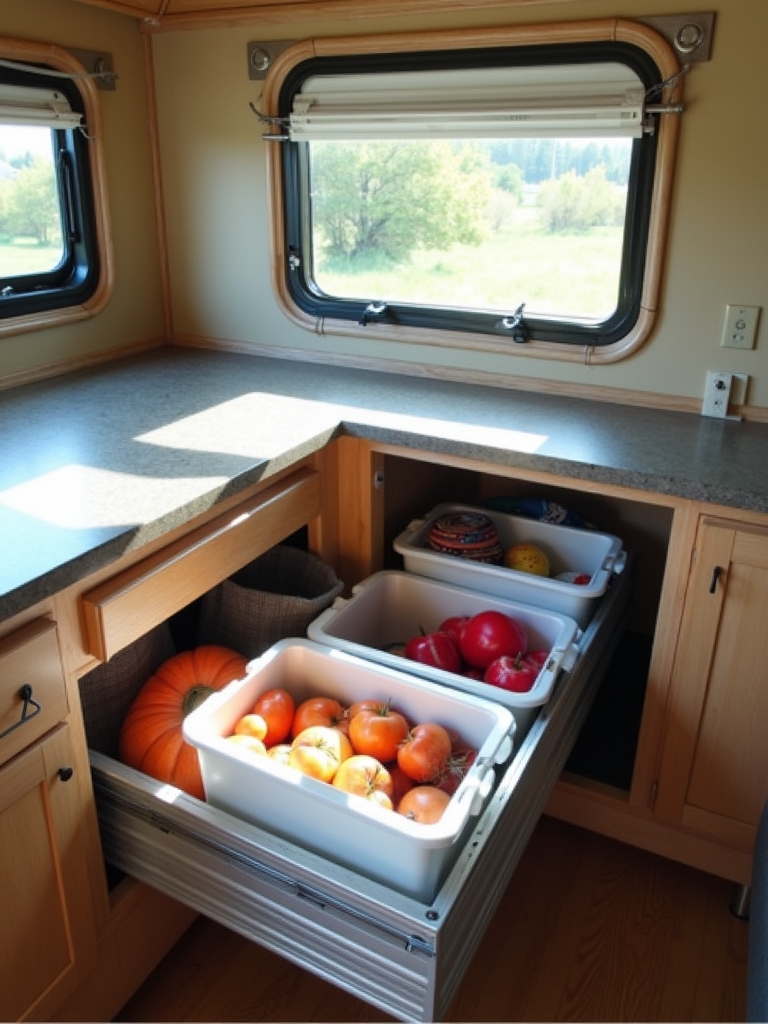
Your RV’s basement compartments hold tremendous storage potential, yet reaching items buried in the back often requires unloading everything first.
Let’s fix that.
Transform these spaces with sliding bin racks built from 2×4 lumber and 27-gallon totes. Install metal drawer slides or wood rails, allowing bins to glide smoothly outward.
You get instant access to your gear while maximizing all that vertical space. This entire project usually costs under $30 and only takes about three hours. It’s high reward for low effort!
Install Pull-Out Wire Baskets in Bathroom Vanities
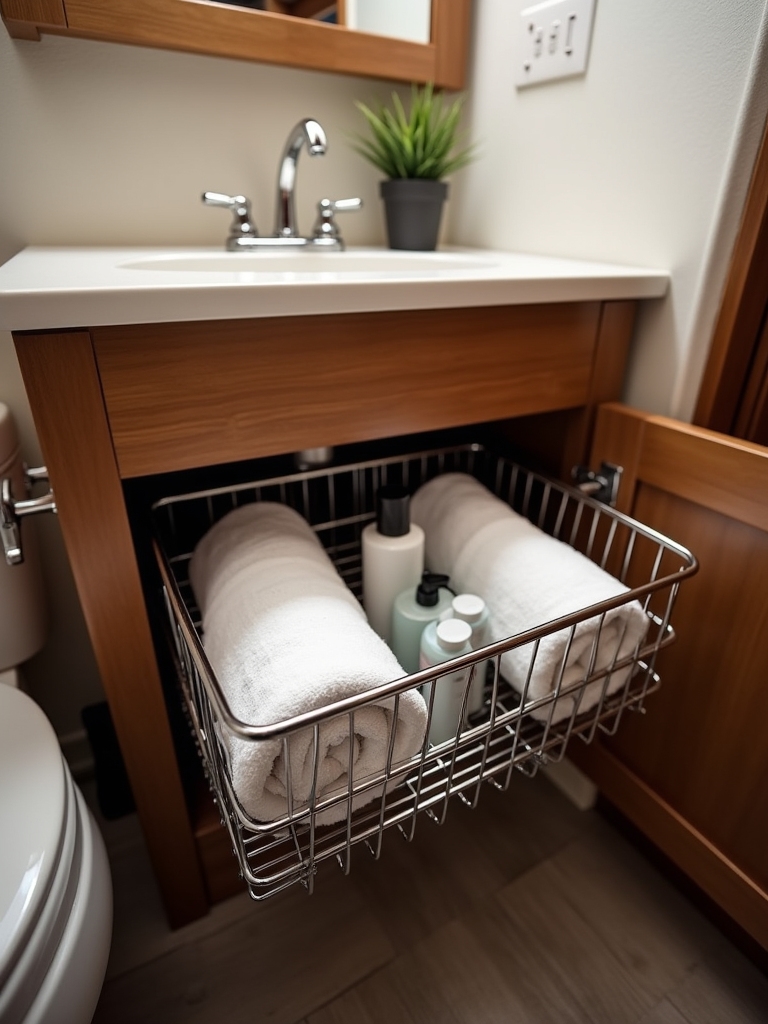
Tiny bathroom vanities are another one of those spaces that just beg for organization. Wire baskets are the perfect answer to transform them into clean, accessible storage that will make your morning routine infinitely easier.
The key here is to maximize every single inch of that vertical space by installing full-extension slides. They bring toiletries within reach.
When you’re picking your storage, definitely choose baskets made from rust-resistant stainless steel or powder-coated ones, especially in humid areas. Mount them onto heavy-duty drawer slides, and then spend five minutes organizing items by category. Trust me, opening your vanity and finding exactly what you need without digging is a tiny, wonderful moment of peace in the morning.
Construct Sliding Pet Food Stations With Built-In Bowls
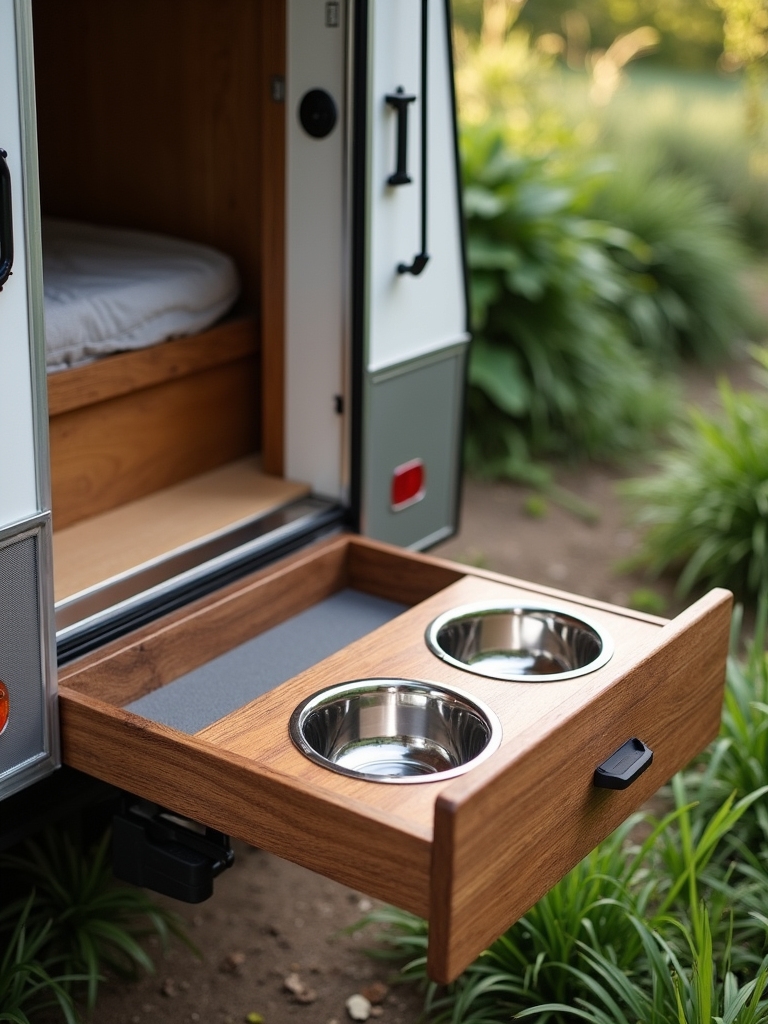
I just love seeing dogs and cats on the road. Since our furry companions are part of the family, creating a convenient feeding solution when they travel with you is essential. It helps maintain their routine, which keeps them happy, and it’s a huge step in keeping your camper organized and less cluttered.
You can beautifully transform some otherwise unused space by building a smart slide-out feeding station with built-in bowls. To start, pick up some sturdy 3/4″-inch plywood, cut precise openings for the bowls, and make sure you install heavy-duty drawer slides. Those bowls will get heavy when full! I always suggest positioning the actual bowls right near the front edge so they are easy for your pet to reach, and if you can manage to sneak in some storage compartments right below for kibble or treats?
And here’s the crucial step: apply a good waterproof coating. That makes cleaning up after those inevitable excited drinking splashes a total breeze!
Add Telescoping Trash and Recycling Bins to Kitchen Areas
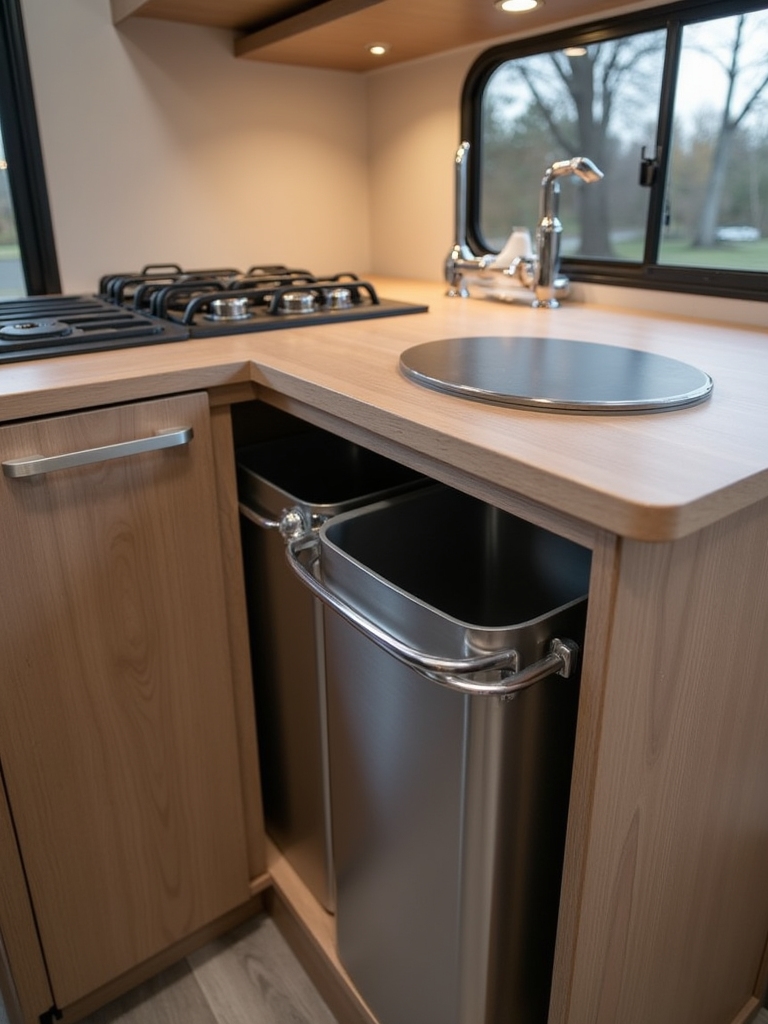
Dealing with trash and recycling is honestly one of the trickiest things in a small space, right? Waste management quickly becomes a headache in compact camper kitchens. That’s why telescoping trash and recycling bins are such an elegant solution for keeping your cooking area clean and organized.
The trick is installing soft-close drawer slides right beneath your counters, fitting them with custom-sized plastic bins. Suddenly, you’ve maximized that dead cabinet space, and all your unsightly waste is concealed but still totally accessible.
A quick designer tip: color-code those containers for super easy sorting, and please, for the love of all that is clean, make sure the lids fit tightly! That prevents any unpleasant odors from joining you on the road.
Build Pull-Out Electronics Charging Stations in Living Spaces
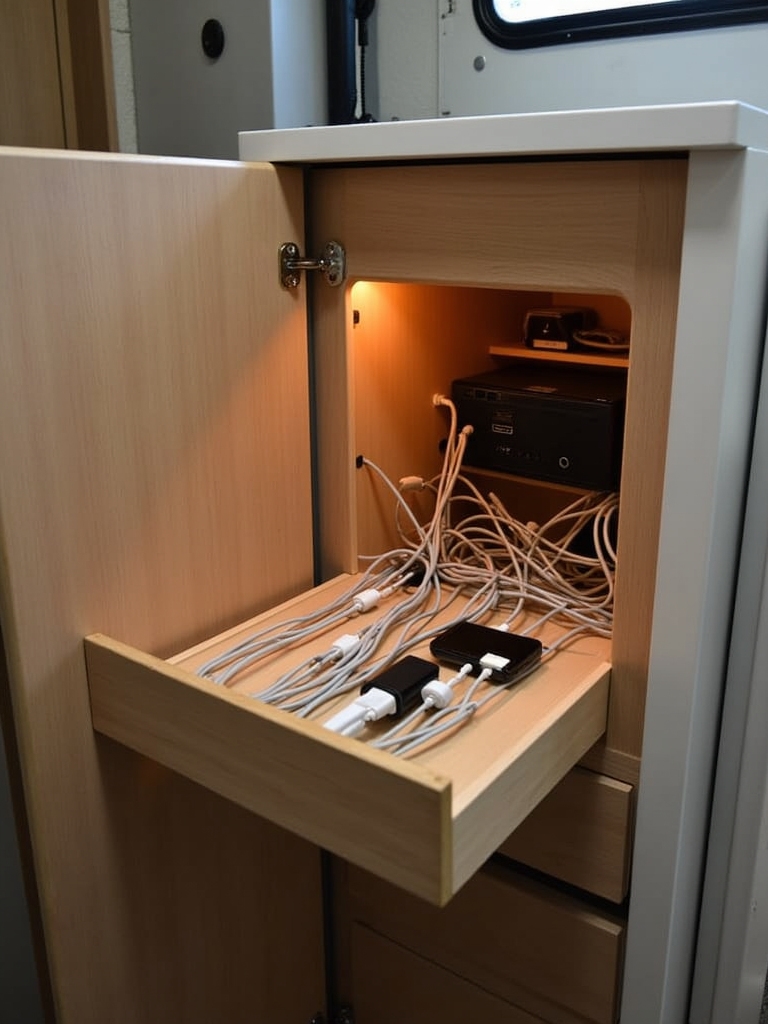
Moving from kitchen organization to living space functionality, you’ll discover that pull-out electronics charging stations solve one of modern RV life’s most persistent challenges.
You can literally transform a messy surface into an organized power hub by adopting sleek slide-out drawers that have recessed USB ports, maybe a wireless charging pad, and a good cable management system. These retractable stations are all about maximizing efficiency, keeping your devices charged up, and having those ugly wires completely hidden from view.
I just finished a client’s tiny home remodel in Salt Lake City, and we installed something similar. It makes the biggest difference in keeping the main living area feeling serene and tidy!
Create Slide-Out Folding Table Extensions for Outdoor Cooking
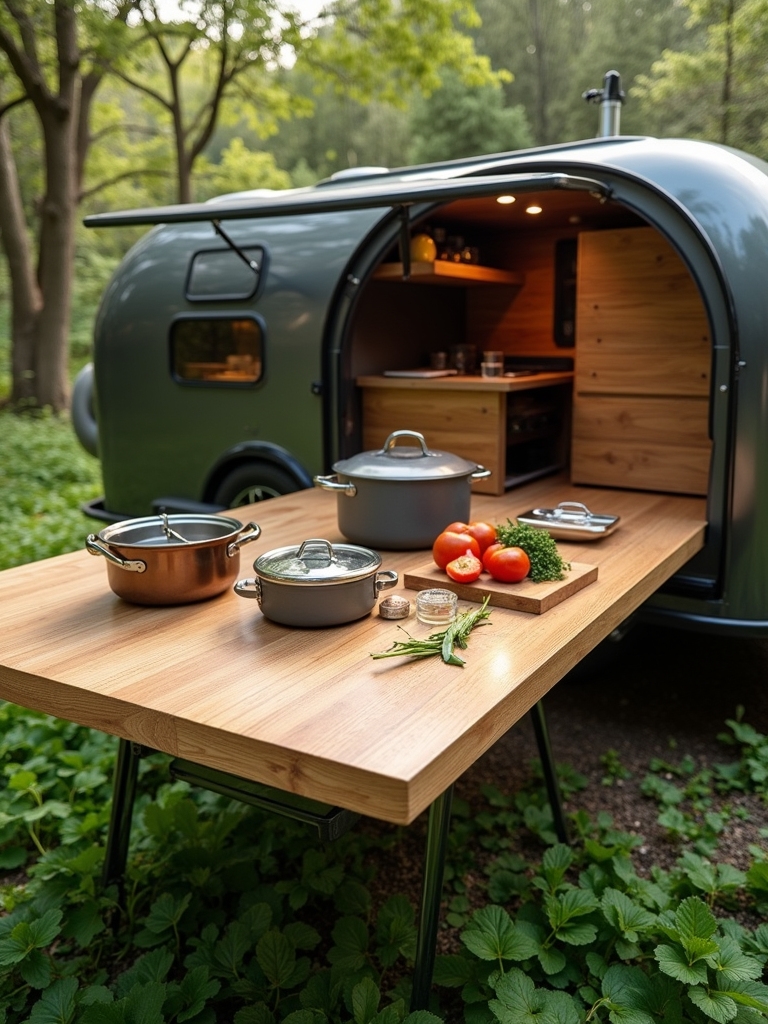
Your phones and tablets are all tucked away and charging neatly, thanks to those awesome pull-out stations we talked about, but let’s be real: outdoor cooking introduces a whole new set of spatial challenges. Nobody wants to juggle a sizzling spatula and a plate on a tiny side table! That’s exactly why slide-out folding table extensions are a brilliant, brilliant solution.
Turn your cramped little exterior spot into a functional outdoor kitchen. Make sure you use something sturdy yet lightweight, like bamboo or plywood, and mount it securely onto heavy-duty drawer slides.
The most interesting part is that these extensions fold up super compactly right against the cabinetry when you’re done, and then glide out smoothly when you need them to create a stable, proper cooking surface. It’s like having an instant countertop appear just when you need to prep those s’mores.
Design Retractable Laundry Hampers in Bedroom Wardrobes
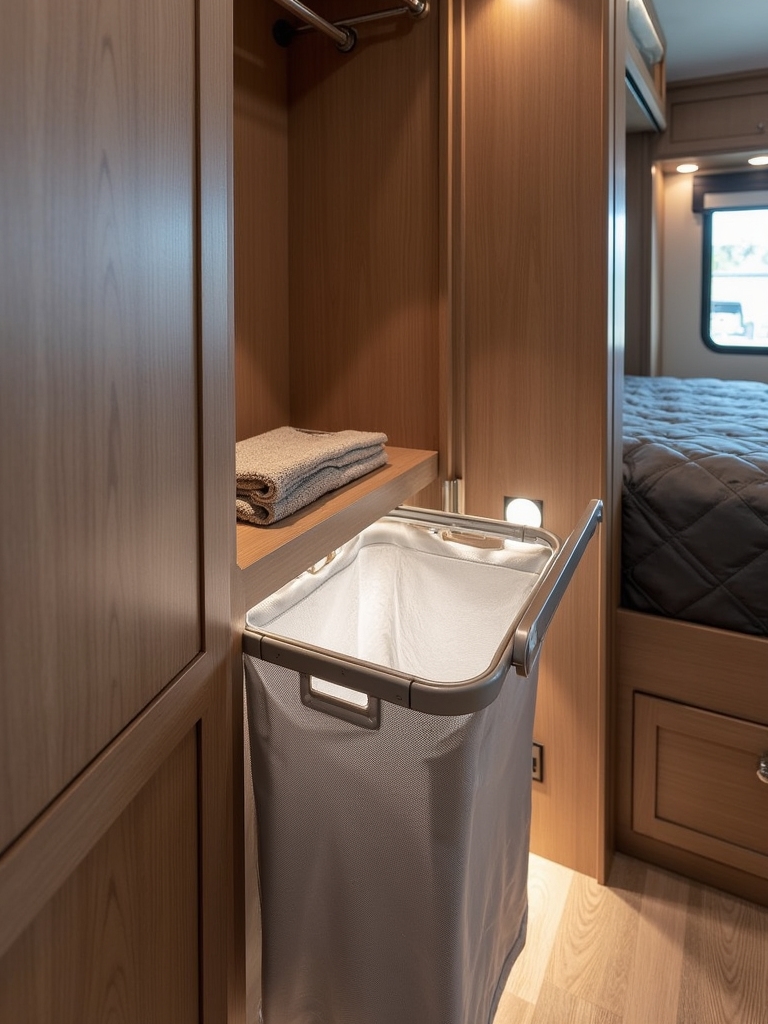
Let’s talk laundry. In a small camper, three things are true: floor space is limited, dirty clothes pile up fast, and you need storage that doesn’t get in the way of walking around.
That’s why retractable laundry hampers are an absolute essential upgrade for your bedroom wardrobe! Install slide-out mechanisms with lightweight frames to really max out that vertical wardrobe space. Using modular baskets means easy removal for laundry day, and make sure you reinforce those pivot points with durable drawer slides so they last for years of adventures.
Install Pull-Out First Aid and Medicine Organizers
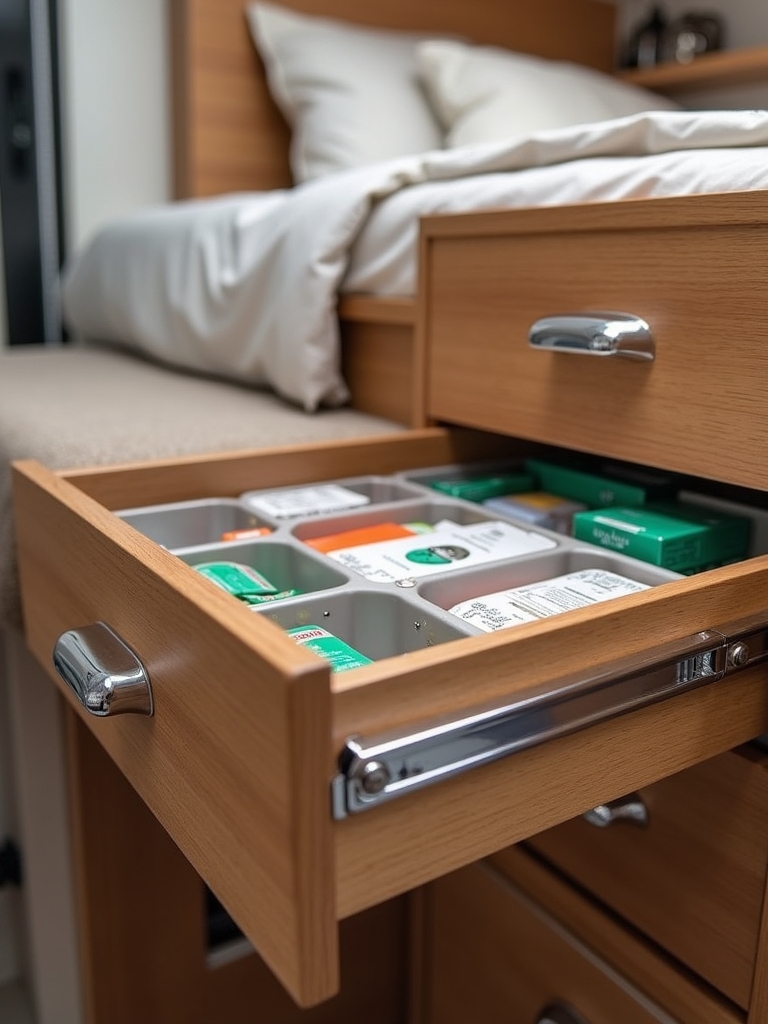
Medical emergencies, unfortunately, never wait for a convenient time. That means your camper’s first aid and medicine supplies need to be just as accessible as that clean laundry! You’ll want to install pull-out organizers using heavy-duty drawer slides rated to handle your kit’s weight. Choose waterproof containers with adjustable dividers, and a pro-tip is to mount them at chest height: this makes them easy to see and grab quickly. And don’t forget elastic straps inside to secure everything during travel. Seriously, the last thing you want is a bottle of pain relievers bouncing around when you hit a bump.
Add elastic straps to secure items during travel.
Build Sliding Game and Entertainment Storage Under Seating
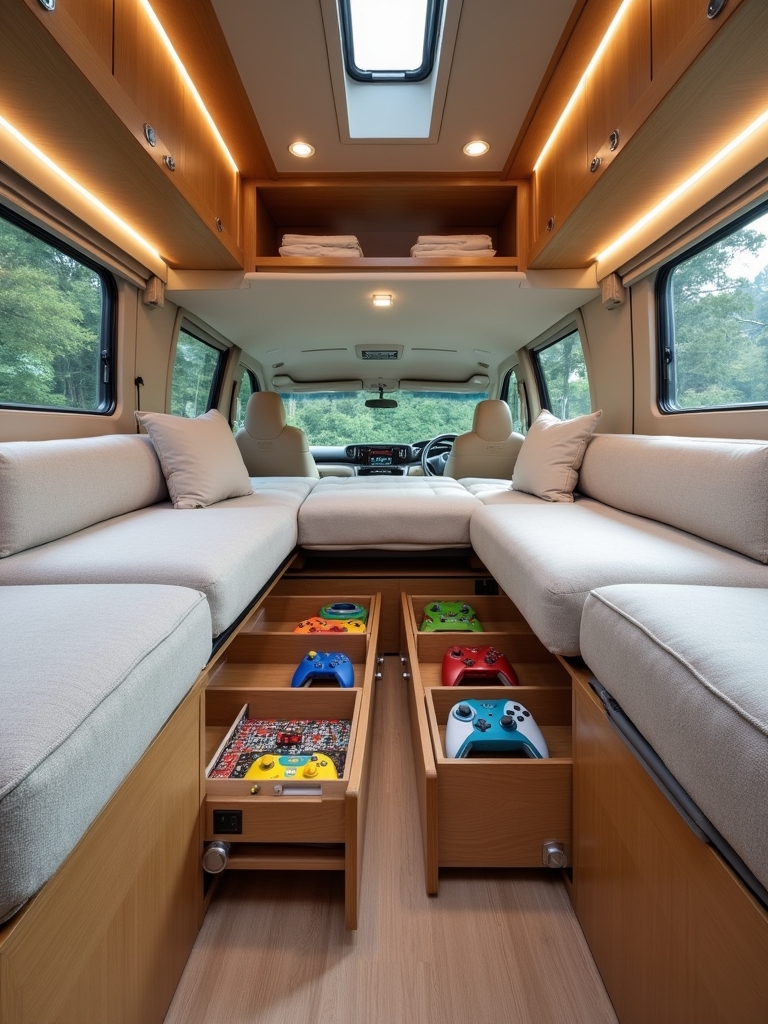
There is so much dead space underneath your camper seating, and it’s just begging to be transformed! Let’s turn it into an organized entertainment hub with custom sliding storage drawers. Maximizing that limited footprint is possible if you install heavy-duty drawer slides that are specifically rated for RV conditions, as they can handle the shaking.
Build the frames from sturdy plywood, definitely add locking latches to prevent any mishaps while driving, and create little compartments perfectly sized for board games, controllers, and tablets. Game night just got so much easier.
Construct Pull-Out Outdoor Gear Racks for Wet Equipment
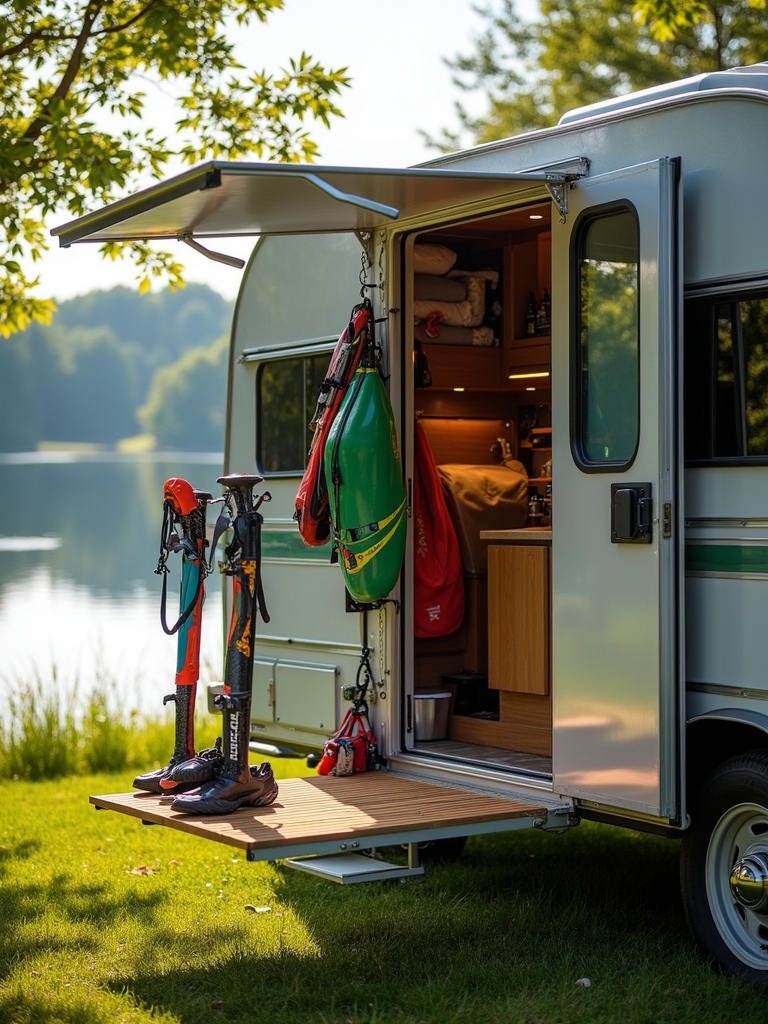
Wet boots, soaked jackets, dripping rain gear: none of that belongs inside your beautiful, dry camper living space. You need a designated drop-zone.
The answer is corrosion-resistant aluminum racks with waterproof drawer slides mounted on the outside. Install marine-grade composite panels with drainage holes, and add rubber gaskets around the edges to seal them up nicely.
Position these pull-out systems right near the entrance, and be sure to incorporate ventilation slots and removable liners. This keeps your gear organized and allows it to dry efficiently in its own separate exterior compartment.
Build Retractable Spice Racks Inside Cabinet Doors
Cramped RV kitchens are notorious for lacking adequate spice storage, but guess what? You can easily double your cabinet capacity by installing clever retractable racks right on the interior doors.
All you need is some plywood, simple ball-bearing drawer slides, and your basic woodworking tools. The mounting is key here: put one slide an inch from the bottom and the other three to four inches from the top.
Add a few small blocking pieces for a nice, flush alignment, and then secure everything with countersunk screws for smooth operation. Now you can find your cumin without knocking over everything else.
Create Under-Sink Slide-Out Cleaning Supply Organizers
That dark, awkward space beneath your RV sink is usually a chaotic jumble of bottles and brushes, but it doesn’t have to be that way! You can transform this frustrating area by installing custom slide-out organizers that are cleverly designed to work around all those pesky pipes and disposal units.
Build multiple pull-out trays using 3/4-inch plywood and full-extension drawer slides. These accessible organizers eliminate the need for deep reaching and bending, maximizing every single inch of that valuable, weirdly-shaped storage space.