You know that house in every neighborhood that goes absolutely all-out for Halloween?
The one with the full graveyard scene, fog rolling across the grass, tombstones glowing eerily after dark, and skeleton hands reaching up from the soil?
Yeah — that house is so much more achievable than it looks. Honestly, I love everything about a well-done halloween graveyard yard decoration and this tutorial is my favorite thing to share every October because the results are just so satisfying!
Building a DIY halloween yard graveyard from scratch does not require a big budget or a lot of experience. What it does require is a plan; the setups that look incredible are not random.
They are intentional, zoned, and lit correctly. Everything in this guide builds on the zone-based approach covered in our halloween decorations outdoor complete guide, so start there if you want the full framework before you buy a single prop.
SIMPLE-tip: Grab your tombstones and skeleton props in late September. Both categories sell out at most big-box stores by the second week of October, and you will want time to seal, paint, and arrange everything before Halloween arrives. Planning ahead is the real secret weapon here!
| QUICK SUMMARY:
A halloween yard graveyard is the outdoor halloween setup with the highest ceiling of any prop category. Done well, it stops cars and earns your house a neighborhood reputation that lasts for years. This full tutorial covers everything from planning your layout to choosing tombstones, spacing them correctly, adding skeleton props, lighting the whole scene, and finishing with the details that make it look genuinely haunted rather than just decorated. |
Step 1: Plan Your Graveyard Zone Before You Buy Anything
PLANNING · 10 MINUTES
Can we talk about how much easier this whole project gets when you do five minutes of planning first?
So many incredible setups fall flat because someone bought twelve tombstones with no plan and then scattered them randomly across the lawn.
Random equals low impact. Zoned equals showstopper. Total difference!
Pick a zone
Walk your front lawn and pick a zone that is clearly visible from the street and has enough depth. Front to back, to layer props at different distances.
The best halloween cemetery yard setups have at least three depth layers: foreground props at the street edge, mid-ground tombstones and skeletons, and a focal piece at the back that anchors the whole scene.
A minimum zone of roughly eight feet wide and six feet deep gives you enough room to work with without crowding everything together.

Sketch a rough layout
Sketch a rough layout on paper — even a quick pencil scrawl works. Mark where your tallest tombstone goes, where your ground-level skeleton hands sit, and where your lighting stakes will land.
Our outdoor skeleton decorations guide shows exactly how skeleton props at different emergence stages create narrative depth throughout the graveyard zone. Planning takes ten minutes and saves a full afternoon of repositioning.
RELATED: 14 DIY Witch Decorations for Your Yard That Are Actually Impressive!
Step 2: Choose Your Tombstones (Foam vs Plastic vs Wood)
SHOPPING · PREP WORK
Honestly, this is the decision that makes or breaks the whole look, so let’s get into it!
Not all tombstones are created equal — and the material you choose affects how the display reads from the street, how long it lasts, and how much customization you can do.
| Material | Best for | Durability | Customizable? | Avg. cost |
| Insulation foam | DIY builders, multi-season use | 5+ seasons if sealed | Yes — carve and paint freely | ~$3 per tombstone |
| Molded plastic | Quick setup, store-bought ease | 3 to 4 seasons | Limited — paint only | $15 to $40 per set |
| Treated plywood | Large statement pieces | 5+ seasons | Yes — cut any shape | ~$10 per tombstone |
Foam is my personal favorite and the hands-down best option for a first-time DIY graveyard halloween decoration.
Pick up two-inch insulation foam sheets at Amazon and cut tombstone shapes with a serrated knife. No special tools needed.
The HGTV’s foam tombstone tutorial is the clearest step-by-step guide I’ve seen for getting the lettering right and creating a realistic aged stone finish.
Paint with exterior latex paint in grey, dry-brush a lighter grey over the top for texture, and seal with exterior spray. Your tombstones will survive multiple October seasons without warping. Total win!
SIMPLE-tip: Foam tombstone sets at Amazon are a solid middle ground if you’re short on time — pre-shaped and ready to paint.
Step 3: Spacing and Arrangement (The Rule Real Graveyards Follow)
LAYOUT · PLACEMENT
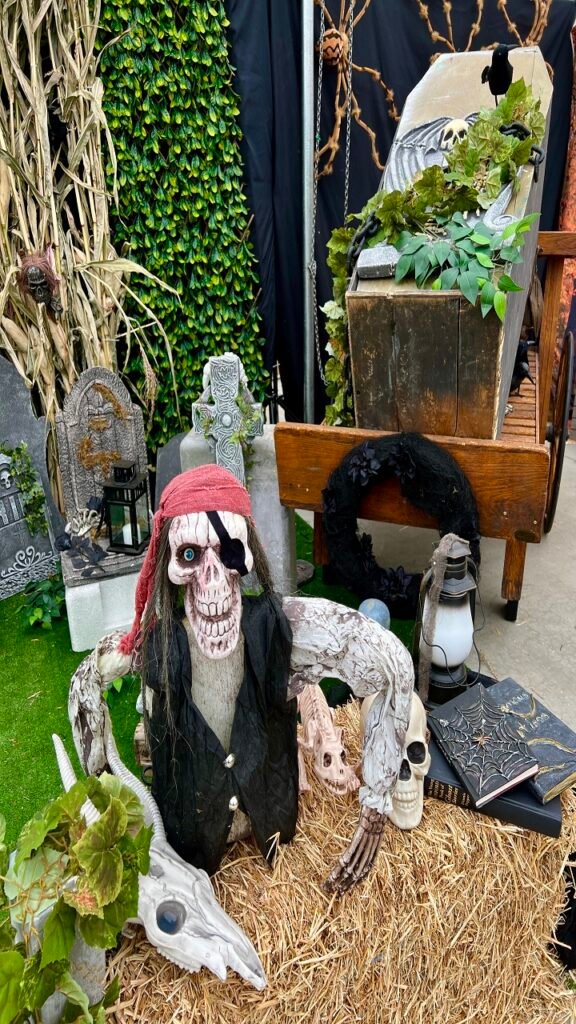
Here is the thing nobody tells you. Even spacing is the enemy of a convincing graveyard scene.
Real cemeteries are messy and organic!
Some sections are dense, some are sparse. Stones are tilted. Rows drift.
Mimicking that organic randomness is what makes a yard graveyard read as genuinely haunted rather than a set of signs someone pushed into the lawn in a straight line.
Group them in clusters
Group tombstones in clusters of two or three rather than spreading them individually across the zone.
Leave some open soil between clusters so the eye has room to breathe. Within each cluster, vary the heights; tall stone at the back, shorter ones in front.
Tilt a few tombstones slightly off vertical as if they have settled over decades. Instructables has a detailed tombstone arrangement photo guide that shows exactly how mixed heights and tilted placement work together in a real yard graveyard setup.
The same layering and grouping principle that makes fall vignettes read as curated and intentional works exactly the same way here.
A few specific placement decisions create visual depth that a flat, evenly-spaced arrangement never achieves. Plan your clusters before you drive a single stake.
RELATED: 17 Outdoor Ghost Decorations That Actually Look Good (+ How to DIY the Viral Swinging Ghost)!
Step 4: Add Skeleton Props Throughout the Graveyard
PROPS · SCENE BUILDING
A graveyard without skeleton props is just a collection of signs.
Skeleton hands, arms, and full rising figures are what transform a tombstone arrangement into an actual scene.
And the spacing between skeletons and tombstones is what makes the whole thing read as one cohesive story. Genuinely one of my favorite parts of the whole build!
Follow this simple idea
Place skeleton hand and arm stakes in the open soil between tombstone clusters.
Never directly beside a stone, always in the gaps.
Find skeleton ground breaker stake sets at Amazon that include the arm pieces for the most realistic emergence effect.
Position each set at a slightly different angle so they look like individual events rather than a matched set pushed in at the same depth.
According to Instructables’ halloween prop guide, mixing prop scales, small hands at the front, larger torso pieces at the rear — creates the illusion of depth that makes even a small yard graveyard feel expansive.
Full rising skeleton torsos work best at the back of the graveyard zone rather than the front.
Placing the most dramatic prop at the rear creates a visual pull that draws the eye deeper into the scene. Our full outdoor skeleton decorations guide covers skeleton staging in detail, including exactly how many emergence points work for different yard sizes.
Step 5: Add Creepy Cloth, Dead Branches, and Detail Props
TEXTURE · FINISHING DETAILS
Honestly, this is the step that most people skip. And it is the exact step that separates a good graveyard from a genuinely unforgettable one.
Tombstones and skeletons do the heavy lifting. Detail props are what make the whole scene feel lived-in and real, like something has been slowly decaying there for decades.
Stretch black or grey creepy cloth loosely between tombstone clusters, letting it drape from stone to stone at irregular angles.
Pull it apart so it reads as actual webbing rather than a folded sheet — thin and wispy always beats bunched and dense.
Dead branches or bare twigs pushed into the soil around the tombstone bases add an organic texture that no manufactured prop can replicate.
Free and genuinely so effective!
Finishing detail props that complete the scene:
- Wilted silk flowers laid flat across a ‘grave’ — thrift stores carry these for almost nothing,
- A hand-lettered wooden sign at the graveyard entrance reading ‘Rest In Pieces‘ or ‘Enter If You Dare‘,
- Black caution tape strung between two stakes at the perimeter edge,
- A flickering LED lantern placed at the base of the tallest tombstone,
- Scattered fallen leaves raked into the open soil patches between stones.
SIMPLE-tip: Hot glue a few large plastic spiders onto your creepy cloth before stretching it between tombstones. The spiders catch light at night and give trick-or-treaters something to spot as they get closer.
That layered discovery is exactly what makes the fall decor staging principle work so well outdoors. Pure genius and such an easy add!
Step 6: Light Your Graveyard (This Is the Most Important Step)
LIGHTING · NON-NEGOTIABLE
Your graveyard can have the most beautiful tombstones and the most dramatically posed skeletons in the neighborhood.
And nobody will fully appreciate any of it after dark without proper lighting.
Lighting is not optional
Lighting is not optional in a halloween yard graveyard. It is the whole thing. This step is where the real magic happens and honestly I could talk about it all day!
Ground-level uplighting is the non-negotiable foundation.
Place solar stake spotlights between tombstone clusters aimed directly upward at each stone from the front.
Uplighting throws dramatic shadows behind each tombstone and onto the lawn, making the stones look three times taller and genuinely ancient. Green or deep purple colored spotlights transform the entire zone into something supernatural.
According to Haunted Props, colored LEDs paired with fog are the single most powerful combination in any outdoor halloween display. The fog catches and diffuses the colored light in a way that no static prop ever can.
Add a mid-height lighting layer using orange outdoor string lights strung at about four feet above the graveyard zone between two garden stakes.
Our outdoor lighting principles guide covers exactly why layered lighting at multiple heights creates depth that single-source lighting never achieves.
Position a single flickering LED candelabra at the very back of the graveyard zone as a dramatic focal point after dark. Genuinely so satisfying when the three layers come together!
Step 7: Set Up Your Fog Machine Correctly
FOG · ATMOSPHERE
So many graveyard setups run the fog machine right at the front edge of the display where the fog immediately disperses into the open air and vanishes.
The goal is fog that pools and lingers between the tombstones, not fog that evaporates the second it exits the nozzle.
Positioning is everything here!
Place your outdoor fog machine at the center rear of the graveyard zone rather than at the front or side.
Aim the output nozzle toward the center of the display so fog rolls forward and collects between the tombstones.
Safety note
Run the machine on a smart plug timer set to cycle every four minutes. Constant operation depletes fluid fast and overheats the unit.
The NFPA recommends keeping all electrical halloween devices at least two feet from flammable materials like dried leaves, hay bales, or fabric draping. Safety first, spooky second — and honestly both are totally achievable! Cheers to that!
Step 8: The Finishing Details That Make People Stop the Car
FINAL TOUCHES · THE 10%
Here is the thing about a great halloween yard graveyard display. The props and the lighting get you ninety percent of the way there.
The final 10% is a handful of small details that cost almost nothing. But make every single person who approaches feel like they have stepped into something genuinely designed rather than just assembled.
These are my absolute favorites and the most fun part of the whole build!
A hand-lettered perimeter sign is the single highest-return finishing detail.
Cut a piece of weathered looking wood or foam board and letter it with a black paint marker: ‘Private Cemetery — Trespassers Will Be Buried,’ ‘Established 1692,’ or ‘Beware: The Dead Walk at Midnight.’
Plant it at the graveyard entrance on a simple garden stake.
The backyard staging principle of anchoring a display zone with a clear entry point applies perfectly here. The sign defines where the scene begins and tells everyone they are entering something intentional.
Scatter a few final texture elements across the open soil.
Like a rusted old key partially buried near a skeleton hand, a cracked ceramic skull nestled between tombstone bases, a single black candle holder with a melted faux wax candle.
None of these cost more than a few dollars at a thrift store or dollar section.
Pair the finished display with any of the ghost setups from our outdoor ghost decorations guide — a few hanging ghosts at the perimeter of the graveyard zone add movement and height that the tombstone-level props alone cannot achieve. Truly clutch and honestly such a satisfying final result!